Projeto Flow

This game was part of a group of educational activities about classic music that took place at SESC Carmo – SP. The challenge was to create some multimedia piece, which could present particular authors.

The final result was an adaptation of the game Auditorium, transported to an installation size. Then we had a puzzle game, developed with Processing/ReactVision, and projections.


Anim-and-play

This video is demonstrates the Anim-and-play software in action. The software were developed by the instructor Paulo, for vacations activities (July/2010) at SESC Carmo, São Paulo/Brasil.

The software aims to help teaching young kids and children to understand some basic concepts in animation techniques.

The idea behind this software, is to teach children how simple animations works by they creating their own creatures. These creatures will be used in a very simple game based on computer vision techniques.

This project is been developed on Linux (Ubuntu 9.04), using Processing (processing.org) as framework. It was also successfully tested on Mac OSX, and Windows(but hard to configured on Win).

It is still a work in progress, so there are some bugs, crashes, and not mature game-play.
The software is available under GPL license, for common usage and development contribution. Check the project web-page: http://code.google.com/p/anim-and-play/
You must read the wiki page for details.

G.R.E.S. Unidos da Escandinávia (2006-2008)

This project was meant to take place during Carnival season, as an entertainment activity for families visiting SESC Santana facilities. All the three versions were games where people should play Samba loops according to the rhythm. The sound was created by participants in an earlier workshop about Samba percussion instruments.

2006:
Software with a very simple mouseover interactivity to play Samba loops.
Environment: Flash.

2007:
Software with keyboard interaction, while playing the Samba loops, the player also edit a video clip.
Environment: Blender.

2008:
Software with Computer Vision based interactions. The player motion was captured by webcam streaming, the image was analyzed, and according to the player’s motions, the Samba loops were executed.
Environment: Python.

Blender Game Engine Course – class 1

Hi folks!
In next week, I’ll teach the Blender game engine, in a course at SESC Carmo (in São Paulo). I intend to post videos (screencasts) recorded during the course, here in my blog, as well as the work files. The videos will be in portuguese, but hopefully I will have time to prepare some subtitles in english… and make these material a bit more universal.

The first video is an introduction specially dadicated to Linux and Mac users, but also usefull for Windows users.

See you.

Panda3D gamedev tutorial 4

In this tutorial, we will see how to work with simple physics simulations in Panda3D’s built in physics engine. This simulations will be applied in our avatar movement, and ability to jump. Also we will explore briefly, Panda3D’s Interval features.

This tutorial aims to show how to use in a simple way, a physics engine. Just in case you are interested in learn about the use of ODE in Panda, check out this tutorial: http://paulobarbeiro.com.br/blog/?p=77&lang=en, it might be helpful.

Bad news guys! A good amount of all our logic will be lost! Most of all the logic related to the avatar’s movement, described in previous tutorials, will no longer work with physics simulation. I hope that can teach you something: Do not feed emotional feeling to your code! 🙂 And think well if you want to use physics or not, because the code will not be the same!

The work in this tutorial will be a bit long. And to make it easy to understand, we will talk a bit about physics engines, and how to implement them, afterwards, we will implement our code.

Physics Engines ——————-

Physics engines are softwares dedicated to perform physics calculus, usually Newtonian physics, to many different applications, and games is one of them.

These game engines, has one single work: calculate physics. That’s all! Physics engines, do not render screens, do not capture user inputs, do not synthesize audio. They just perform calculus, based on physic formulas.

Each engine has a certain number of formulas, it’s up to you choose the engine based on the features you will need.

So, how they work? how to use them on games?

Till now, in our tutorials, we had change our avatar’s coordinates values in order to simulate it’s movements. To move the avatar towards the right side, we have incremented it’s x position. And this is an absolutely acceptable approach, as far as we do not concern to realistic movements.

Any one can see that our avatar, falls at a constant speed. Which is not a realistic fall. In our universe, gravity speeds up the fall. In order to achieve more realistic results, implement physics simulation is crucial.

So, what change when some physics engine is implemented? We do not touch the object coordinates! When some physics engine is been used, we think about movements as a result of forces been applied to the objects! That means: to an object move towards right, a force, pointing to right, must be applied to this object. And all the jobs is upon the engine. The object movement, will be a result of physics calculus, performed by the engine. Our job will be select, and calibrate the forces that will be applied.

Think in movement as a result of applied forces isn’t hard. But it demands a little knowledge, of how to describe this forces mathematically: Vectors. Everybody knows that! We all studied this subject at the school, is just a matter to remember! This link might help a little bit.

There are a huge number of content about vectors, vector operations, forces, vector forces, on internet, just google it!

Now, we have seen a bit of concepts in physics engines usage. Let’s see, conceptually, how to apply this concepts in our game.

Till now, our avatar moves in three directions: left, right, down. So, to make our avatar move in this directions, by forces, we will have:
– down: gravity force;
– right: a push force towards right;
– left: a push force towards left.

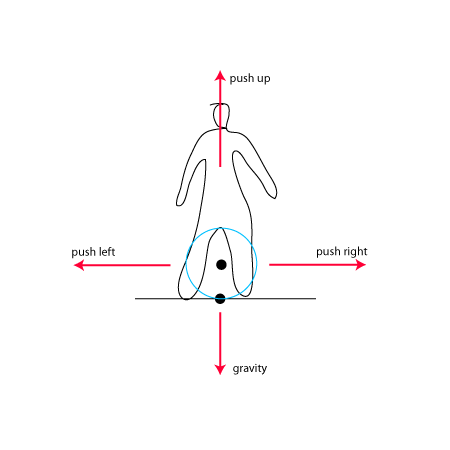
In case we want a jump, a push force towards up, will be needed. See the graph bellow:

grafo05

The graph above, shows the forces we will use, and their vector representation. For example, the gravity: Vec3(0,0,-9.81).
Those vector values, are XYZ “coordinates”. I gravity case: x=0, y=0, z=-9.81; that means, gravity pushed down, with 9.81 intensity (in Newtons).

In this tutorial, all forces are pointing to simple directions. See bellow:
– pushRight: Vec3(10,0,0): points to rightwards (x positive), intensity 10
– pushLeft: Vec3(-10,0,0): points leftwards (x negative), intensity 10
– pushUp: Vec3(0,0,20): point upwards (z positive), intensity 20

In our code, we will implement the basic Panda3D’s built in engine. During this process, we will see, how to implement the basic elements, and logic solution for problems.

Let’s start the first step. In Panda-tut-00.py file, we won’t change it much. In this main file, we just import and initialize the PhysicsCollisionHandler, which will be responsible for collision detections.

[code lang=”python”]
from pandac.PandaModules import loadPrcFileData
loadPrcFileData(”,’show-frame-rate-meter 1′)

import direct.directbase.DirectStart
from pandac.PandaModules import *

from direct.task.Task import Task
from direct.showbase.DirectObject import DirectObject

from avatar import Avatar

#game class
class Game(DirectObject):
def __init__(self):
#init collider system
traverser = CollisionTraverser()
base.cTrav = traverser
base.cTrav.setRespectPrevTransform(True)

base.pusher = CollisionHandlerPusher()
base.pusher.addInPattern(“%fn-into-%in”)
base.pusher.addOutPattern(“%fn-out-%in”)

base.physics = PhysicsCollisionHandler()
base.physics.addInPattern(“%fn-into-%in”)
base.physics.addOutPattern(“%fn-out-%in”)
base.enableParticles()

#load platform model
self.plataforma = loader.loadModel(“../assets/eggs/plataformaBase”)
self.plataforma.reparentTo(render)
self.plataforma.setPos(0,10,0)
#load background sky
self.wall = loader.loadModel(‘../assets/eggs/papelParede’)
self.wall.reparentTo(render)
self.wall.setScale(1)
self.wall.setPos(-5, 30, -2)
#avatar
avatar = Avatar()
avatar.setCollision(traverser)

game = Game()
run()
[/code]

Pay attention that in this code, we just add the lines 24, 25, 26, and 27. The PhysicsCollisionHandler works just like the other handlers, the mayor difference is that it requires the particle system activation (line 27). The CollisionHandlerPusher, will not work here, but I left those line, for you to compare handler pusher with handler physics.

Now in Avatar class, there ar lots of changes! The code is presented below, and than the explanations.

avatar class code
[code lang=”python”]
from direct.showbase.DirectObject import DirectObject
from direct.actor.Actor import Actor
from direct.task import Task
from pandac.PandaModules import *
from direct.interval.IntervalGlobal import *

#modulo da classe Avatar
class Avatar(DirectObject):
def __init__(self):
self.persona = render.attachNewNode(‘persona’)

self.personaActorNode = ActorNode(‘personaActorNode’)
self.personaActorNode.getPhysicsObject().setMass(35)
self.personaActorNP = self.persona.attachNewNode(self.personaActorNode)
base.physicsMgr.attachPhysicalNode(self.personaActorNode)

self.personaActor = Actor(‘../assets/eggs/personagem.egg’,
{‘idle’:’../assets/eggs/personagem-parado’,
‘run’ :’../assets/eggs/personagem-correr’,
‘jump’:’../assets/eggs/personagem-pular’}
)
self.personaActor.setScale(1)
self.personaActor.setPos(0,0,5)
self.personaActor.reparentTo(self.personaActorNP)

self.persona.setPos(0,10,10)
self.persona.setScale(.15)
self.persona.setH(90)

self.state = { ‘left’ :False,
‘right’ :False,
‘ground’:False,
‘canJump’ :False
}

taskMgr.add(self.movement, “Avatar Movement”)

#timer for jump
self.startCallforJump = 0
self.timer = LerpFunc(self.performJump,
fromData = 0,
toData =1,
duration = 0.25,
blendType=’easeIn’,
extraArgs=[],
name=None)

#capture keyboard events
self.accept(‘arrow_left’, self.changeState, [‘left’,True])
self.accept(‘arrow_left-up’, self.changeState, [‘left’,False])
self.accept(‘arrow_right’, self.changeState, [‘right’,True])
self.accept(‘arrow_right-up’, self.changeState, [‘right’,False])
self.accept(‘space’, self.changeState,[‘jump’,True])
self.accept(‘space-up’, self.changeState,[‘jump’,False])
#capture collision events
self.accept(‘bola0CN-into-plataforma’, self.changeState, [‘ground’,True ])
self.accept(‘bola0CN-out-plataforma’, self.changeState , [‘ground’,False])

#Persona physics forces
self.pushUp=LinearVectorForce(0,0,20)
self.pushUpFN = ForceNode(‘pushup-force’)
self.pushUpFNP = render.attachNewNode(self.pushUpFN)
self.pushUpFN.addForce(self.pushUp)

self.pushLeft=LinearVectorForce(-10,0,0)
self.pushLeftFN = ForceNode(‘pushleft-force’)
self.pushLeftFNP = render.attachNewNode(self.pushLeftFN)
self.pushLeftFN.addForce(self.pushLeft)

self.pushRight=LinearVectorForce(10,0,0)
self.pushRightFN = ForceNode(‘pushright-force’)
self.pushRightFNP = render.attachNewNode(self.pushRightFN)
self.pushRightFN.addForce(self.pushRight)

self.gravityFN=ForceNode(‘world-forces’)
self.gravityFNP=render.attachNewNode(self.gravityFN)
self.gravityForce=LinearVectorForce(0,0,-9.81) #gravity acceleration
self.gravityFN.addForce(self.gravityForce)

base.physicsMgr.addLinearForce(self.gravityForce)

def setCollision(self, trav):
#colision nodes and solids
self.ball0 = CollisionSphere(0,0,1.5,1.5)
self.ball0NP = self.personaActorNP.attachNewNode(CollisionNode(‘bola0CN’))
self.ball0NP.node().addSolid(self.ball0)
self.ball0NP.show()

base.physics.addCollider(self.ball0NP, self.personaActorNP)
base.cTrav.addCollider(self.ball0NP, base.physics)

def movement(self, task):
#print self.personaActorNode.getPhysical(0).getLinearForces()
if(self.state[‘left’] == True):
if(len(self.personaActorNode.getPhysical(0).getLinearForces()) == 0):
self.personaActorNode.getPhysical(0).addLinearForce(self.pushLeft)
else:
self.personaActorNode.getPhysical(0).removeLinearForce(self.pushLeft)

if(self.state[‘right’] == True):
if(len(self.personaActorNode.getPhysical(0).getLinearForces()) == 0):
self.personaActorNode.getPhysical(0).addLinearForce(self.pushRight)
else:
self.personaActorNode.getPhysical(0).removeLinearForce(self.pushRight)

return Task.cont

def changeState(self, key, value, col=None):
if(self.state[‘canJump’] == True and key == ‘jump’):
if(value==True):
self.startCallForJump = globalClock.getRealTime()
if(value == False):
preparationTime = globalClock.getRealTime() – self.startCallForJump
if (preparationTime > 0.4): preparationTime = 0.4
elif(preparationTime 0):
self.personaActorNode.getPhysical(0).removeLinearForce(self.pushUp)
[/code]

Lets start in function __init__(self):

The first change here is to add an ActorNode to our avatar’s nodes structure. The ActoNode class is a special node class to be used in physics system. Do not confuse ActorNode with Actor class, which is used to play animation in rigged models.
First we create an ActoNode (line 5), than it’s mass is set; The ActorNode is attached to persona node, and the nodepath resulted is attached to physics handler.
Pay attention to another important detail, in line 17: the personaActor node (our model node), is attached to the ActorNode. This link will make the model move according physics simulations.

In lines 39 and 40, there is one variable and one function, that are gonna be used for avatar’s jump. More about it soon.
In lines 53 and 54, we capture the user input in space bar.

In lines 60 till 80, the forces to be applied in our avatar are set. In line 71, one of the forces is been applied, the gravity.

The forces are created as a vector force, the class LinearVectorForce, that contains the force direction and intensity. Also a ForceNode, attached to render, is needed.

The setCollision function:
Not much changes here. Note that now, collisionNodes are linked to PhysicsCollisionNode.

The movement function:
Here we have the logic that moves the avatar to left or right. Basically, the avatar state changes with user input, than this function applies the forces according this state changes. The methods addLinearForce() and removeLinearForce(), are pretty much self-explanatory, are they?

The changeState function:
In this function there is a special logic to avatar’s jump.
The avatar will perform the jump, when user releases the space bar, and the power of the jump, will vary depending on the time the user held the bar pressed.
When space bar is pressed the function evaluates if the avatar can jump (canJump = if the avatar is on the platform). Than the function evaluates if the key were pressed or released; If the key was pressed, the function stores the moment when the key was pressed; If the key was released, the function calculates the time it was pressed, than this value divides a value of 1000, than the result of such division is applied to the pushUp force, and finally a timer, that applies and removes, is started.

The performJump function:
This is a LerpFunction declared in line 40. This function is a sort of timer, that is used to apply the force, and in the next moment, remove it. A human jump, just like any other terrestrials animals, are resulting of one strong force application in one single moment. That is the reason the pushUp force must be removed so soon.

Conclusion??
Well, a simple conclusion?? You don’t need to use physics simulation if the resulting movement is not pleasing you! Physics is just another option! But, get yourself used to them. As more you know them, and better you apply the forces, better the results will look!

Vectors & Physics :: Gamedev Panda3D cookbook

Based on Daniel Shiffman’s essays (http://www.shiffman.net/teaching/nature/)

In order to simulate movements in games, basically we change object’s coordinates values along software’s execution cycles; The result is the illusion of motion.
There some classical way to change those coordinates:
– Simply change the values…;
– Calculating vectors and implement kinematics;
– Physics simulation;

sample 1:

[code lang=”python”]
from direct.showbase.ShowBase import ShowBase
from direct.task import Task

class MyApp(ShowBase):

def __init__(self):
ShowBase.__init__(self)
self.taskMgr.add(self.taskFunction, “testing Task”)
self.cube = self.loader.loadModel(“box”);
self.cube.reparentTo(self.render)
self.cube.setScale(1)
self.cube.setPos(-3,10,-2)

def taskFunction(self, task):
print “Cube’s position is: “, self.cube.getPos()
self.cube.setX(self.cube.getX()+0.01)
return Task.cont

app = MyApp()
app.run()
[/code]

This first sample, show how to create a simple motion by simply changing this cube’s x coordinate value. Pay attention in function taskFunction, over there, the cube’s ‘x’ position is incremented in 0.01 each time the task is executed.

sample 2:

[code lang=”python”]

from direct.showbase.ShowBase import ShowBase
from direct.task import Task
from pandac.PandaModules import Vec3

class MyApp(ShowBase):

def __init__(self):
ShowBase.__init__(self)

self.vector_left = Vec3(-0.01,0, 0)
self.vector_right= Vec3( 0.01,0, 0)
self.vector_up = Vec3( 0 ,0, 0.01)
self.vector_down = Vec3( 0 ,0,-0.01)
self.main_vec = Vec3(0,0,0)

self.taskMgr.add(self.taskFunction, “testing Task”)
self.cube = self.loader.loadModel(“box”);
self.cube.reparentTo(self.render)
self.cube.setScale(1)
self.cube.setPos(-3,10,-2)

self.accept(‘d’, self.changeDirection, [self.vector_right])
self.accept(‘a’, self.changeDirection, [self.vector_left])
self.accept(‘w’, self.changeDirection, [self.vector_up])
self.accept(‘s’, self.changeDirection, [self.vector_down])

def changeDirection(self, direction):
self.main_vec = direction

def taskFunction(self, task):
self.cube.setPos(self.cube.getPos()+self.main_vec)
return Task.cont

app = MyApp()
app.run()

[/code]

This second sample, shows a very simple way to use vectors instead changing coordinates values. Let’s take a closer look on vectors now.

Vectors: ========================================
references:

When an object moves through out a space, there is a very handing way to represent this motion: Vectors. That’s why you use vectors on all those physics equations on school! Vectors host key values to describe motion: Current position, motion direction, motion intensity, and even distances. Vectors might be 2D vectors and 3D vectors, well, theoretically vectors can have infinite dimensions, but let’s keep focus on game usage: 2D or 3D.

Let’s consider a rectangle moving around the screen. In a certain moment, this rectangle will have this description:
[quote]
Location – the point where the rect is now.
Speed – value that represents the distance the rect moves per time unity.
Acceleration – value that interferer on speed: increasing or decreasing it.
[/quote]
Note: This are all vectors, that might be 2D or 3D, depending on how many dimensions the space uses.

Technically loacation is a point, speed and acceleration are vectors, but for our purposes let’s use them all as vectors. Take a look at the next “pseudocode”, to see how location, speed and acceleration interacts to create a motion based on classic physics:

[quote]
speed = speed + acceleration
Location = location + speed
Than draw the thing on scene.
[/quote]

According this very simple algorithm, what we have: acceleration interfere on speed – speed interfere on location – to finish, we have to draw the thing on screen.

sample 3:
[code lang=”python”]
from direct.showbase.ShowBase import ShowBase
from direct.task import Task
from pandac.PandaModules import Vec3

class MyApp(ShowBase):

def __init__(self):
ShowBase.__init__(self)

self.vector_left = Vec3(-0.01,0, 0)
self.vector_right= Vec3( 0.01,0, 0)
self.vector_up = Vec3( 0 ,0, 0.01)
self.vector_down = Vec3( 0 ,0,-0.01)
self.main_vec = Vec3(0,0,0)

self.taskMgr.add(self.taskFunction, “testing Task”)
self.cube = self.loader.loadModel(“box”);
self.cube.reparentTo(self.render)
self.cube.setScale(1)
self.cube.setPos(-3,10,-2)

self.cubeSpeed = Vec3(0,0,0)
self.cubeAcc = Vec3(0,0,0)

self.accept(‘d’, self.changeDirection, [self.vector_right])
self.accept(‘a’, self.changeDirection, [self.vector_left])

def changeDirection(self, direction):
self.main_vec = direction

def taskFunction(self, task):
self.updateCube()
return Task.cont

def updateCube(self):
self.cubeAcc = Vec3(self.main_vec)
self.cubeSpeed += self.cubeAcc
self.cube.setPos( self.cube.getPos() + self.cubeSpeed )

app = MyApp()
app.run()
[/code]

The sample above, show how to implement vector kinematics on our previous vector sample. Pay attention on self.updateCube function, that small algorithm is there. In this sample you will notice that, as soon as you press ‘a’ ou ‘d’ key, the cube will begin move slowly, but it’s speed will increase fast. That happens because when acceleration is constant, the speed will increase at every instant, accumulating it’s previous values, and incrementing to it new acceleration additions.
To change this scenario compare to this code:

sample 3b:

[code lang=”python”]
from direct.showbase.ShowBase import ShowBase
from direct.task import Task
from pandac.PandaModules import Vec3

class MyApp(ShowBase):

def __init__(self):
ShowBase.__init__(self)

self.vector_left = Vec3(-0.01,0, 0)
self.vector_right= Vec3( 0.01,0, 0)
self.vector_up = Vec3( 0 ,0, 0.01)
self.vector_down = Vec3( 0 ,0,-0.01)
self.main_vec = Vec3(0,0,0)

self.taskMgr.add(self.taskFunction, “testing Task”)
self.cube = self.loader.loadModel(“box”);
self.cube.reparentTo(self.render)
self.cube.setScale(1)
self.cube.setPos(-3,10,-2)

self.cubeSpeed = Vec3(0,0,0)
self.cubeAcc = Vec3(0,0,0)

self.accept(‘d’, self.changeDirection, [self.vector_right])
self.accept(‘a’, self.changeDirection, [self.vector_left])

def changeDirection(self, direction):
self.main_vec = direction
self.cubeAcc = Vec3(self.main_vec)

def taskFunction(self, task):
self.updateCube()
return Task.cont

def updateCube(self):
self.cubeSpeed += self.cubeAcc
self.cube.setPos( self.cube.getPos() + self.cubeSpeed )
self.cubeAcc *= 0

app = MyApp()
app.run()
[/code]

A few differences here:
– Note that self.cubeAcc is define only when the key is pressed.
– Note that, self.cubeAcc is set to zero (at the end of function updateCube)

This small differences make the cube accelerates only when you press the keys, after that, the speed gets constant.

In practice, on vectors we have:
– positioning
– direction
– intensity

Those properties are very handy when we think about movements. Thanks to Python, we can calculate all that vectors easily, but that doesn’t happen very often in other languages. Usually we have to watch to vector operations in order to get different vectors, to use them in different motions… Probably the most used vector operation is vector subtraction. Usually we use vector subtraction, in order to make an object pursue another object, the magic happens because: When B vector is subtracted by A vector, the resultant C vector, points to B vector from A vector, with the same size as the distance between A and B.

The next sample shows an usage of this vector subtraction. A sphere goes moving from cube to cube calculating vector subtraction. All the work is in function update (inside Smiley class).

[code lang=”python”]
from pandac.PandaModules import loadPrcFileData
loadPrcFileData(”,’show-frame-rate-meter 1′)

from direct.showbase.ShowBase import ShowBase
from direct.showbase.DirectObject import DirectObject
from direct.task import Task
from pandac.PandaModules import *

class Cube(DirectObject):
loc = Vec3(0,0,0)

def __init__(self, pos):
self.loc = pos
self.loadModels()

def loadModels(self):
self.cube = loader.loadModel(‘box’)
self.cube.setPos(self.loc)
self.cube.reparentTo(render)

# Class smiley ————————————
class Smiley(DirectObject):
loc = Vec3(0,0,1)
speed = Vec3(0,0,0)
acc = Vec3(0,0,0)
mass = 1
maxForce = 0.1

def __init__(self, pathToFollow):
self.loadModels()
self.way = pathToFollow
self.nextIt = 1;
self.next = self.way[1].loc
print “next pos: “, self.next

def loadModels(self):
self.smiley = loader.loadModel(‘smiley’)
self.smiley.setPos(self.loc)
self.smiley.reparentTo(render)

def update(self):
target = self.next
direction = target – self.loc
distance = direction.length()
direction.normalize()
direction *= self.maxForce

self.loc += direction
if(distance = len(self.way) ):
self.nextIt=0
self.next = self.way[self.nextIt].loc
self.smiley.setPos(self.loc)

#game Class —————————————
class MyApp(ShowBase):

def __init__(self):
ShowBase.__init__(self)

self.box0 = Cube(Vec3(0,0,1))
self.box1 = Cube(Vec3(10,0,1))
self.box2 = Cube(Vec3(5,10,1))
self.box3 = Cube(Vec3(-10,10,1))
self.box4 = Cube(Vec3(-10,-5,1))
self.box5 = Cube(Vec3(0,-10,1))

self.wayPoints = (self.box0, self.box1, self.box2, self.box3, self.box4, self.box5)

self.smileyForce = 0.5
self.smiley = Smiley(self.wayPoints)

#code for floor
self.cm = CardMaker(“ground”)
self.cm.setFrame(-20, 20, -20, 20)
self.ground = render.attachNewNode(self.cm.generate())
self.ground.setPos(0, 0, 0)
self.ground.lookAt(0, 0, -1)

self.taskMgr.doMethodLater(4, self.update, “update task”)

# Set the camera position
base.disableMouse()
base.camera.setPos(15, -30, 20)
base.camera.lookAt(0, 0, 0)

self.fiatLux()

def update(self, task):
self.smiley.update()
return Task.cont

def fiatLux(self):

# Directional light 01
self.directionalLight = DirectionalLight(‘directionalLight’)
self.directionalLight.setColor(Vec4(0.95, 0.95, 0.8, 1))
self.directionalLightNP = render.attachNewNode(self.directionalLight)
# This light is facing backwards, towards the camera.
self.directionalLightNP.setHpr(45, -15, 0)
render.setLight(self.directionalLightNP)

game = MyApp()

run()
[/code]

Physics ========================================

In order to simplify physics simulations, game engines provide physics engines. In Panda3D, the default physics engine is ODE.
Those physics engines, do all the physics calculus, collisions, joints, and provide data to update our scene.

sample 4:
[code lang=”python”]

from pandac.PandaModules import loadPrcFileData
loadPrcFileData(”,’show-frame-rate-meter 1′)

from direct.showbase.ShowBase import ShowBase
from direct.showbase.DirectObject import DirectObject
from direct.task import Task
from pandac.PandaModules import *

class MyApp(ShowBase):

def __init__(self):
ShowBase.__init__(self)

self.fiatLux()

#Create physics world
self.world = OdeWorld()
self.world.setGravity(0,0,-9.81)

#prepare for collisions
self.world.initSurfaceTable(1)
self.world.setSurfaceEntry(0, 0, 150, 0.0, 9.1, 0.9, 0.00001, 0.0, 0.002)

#create a space to allow collision events
self.space = OdeSimpleSpace()
self.space.setAutoCollideWorld(self.world)
self.contactgroup = OdeJointGroup()
self.space.setAutoCollideJointGroup(self.contactgroup)

#creates a floor in game scene, and physics world
self.cm = CardMaker(“ground”)
self.cm.setFrame(-20, 20, -20, 20)
self.ground = render.attachNewNode(self.cm.generate())
self.ground.setPos(0, 0, 0); self.ground.lookAt(0, 0, -1)
self.groundGeom = OdePlaneGeom(self.space, Vec4(0, 0, 1, 0))

#Creates a cube in game scene
self.box = loader.loadModel(‘../assets/eggs/box_c.egg’)
self.box.reparentTo(render)
self.box.setPos(0,9.5,7)
self.box.setHpr(5,35,57)
#self.box.setScale(1)
self.box.setColor(0.5, 0.5, 0.5, 1)

#creates a “body”: representation of the cube in physic world.
self.boxBody = OdeBody(self.world)
self.boxMass = OdeMass()
self.boxMass.setBox(100,1,1,1)
self.boxBody.setMass(self.boxMass)
self.boxBody.setPosition(self.box.getPos(render))
#print self.box.getQuat(render)
self.boxBody.setQuaternion(self.box.getQuat(render))
#print self.boxBody.getQuaternion()
#Creates a collision solid for the body
self.boxGeom = OdeBoxGeom(self.space, 2,2,2)
self.boxGeom.setBody(self.boxBody)

# Set the camera position
base.disableMouse()
base.camera.setPos(40, 40, 20)
base.camera.lookAt(0, 0, 0)

self.taskMgr.doMethodLater(4, self.update, “update task”)

def update(self, task):
#mandatory
self.space.autoCollide()
self.world.quickStep(globalClock.getDt())

#Update cube rendering, based on physics world data
self.box.setPosQuat(render, self.boxBody.getPosition(), Quat(self.boxBody.getQuaternion()))

#mandatory when you need collision events
self.contactgroup.empty()
return Task.cont

def fiatLux(self):

# Directional light 01
self.directionalLight = DirectionalLight(‘directionalLight’)
self.directionalLight.setColor(Vec4(0.95, 0.95, 0.8, 1))
self.directionalLightNP = render.attachNewNode(self.directionalLight)
# This light is facing backwards, towards the camera.
self.directionalLightNP.setHpr(45, -15, 0)
render.setLight(self.directionalLightNP)

game = MyApp()

run()

[/code]

In the sample above we have a very simple scene, a cube that falls, and hits a table, but all the motion is simulated by physics engine. The usage of physics engines demand some specific setups, and integration with rendering system, but all the hard work is made by the physics engine.

We also can simulate some forces been applied into objects!! like a kick on a ball; throw a stone; whatever you want… Let’s see a sample, when simulation starts, press ‘f’ key:

[code lang=”python”]

from pandac.PandaModules import loadPrcFileData
loadPrcFileData(”,’show-frame-rate-meter 1′)

from direct.showbase.ShowBase import ShowBase
from direct.showbase.DirectObject import DirectObject
from direct.task import Task
from pandac.PandaModules import *

class MyApp(ShowBase):

def __init__(self):
ShowBase.__init__(self)

self.fiatLux()

self.world = OdeWorld()
self.world.setGravity(0,0,-9.81)

self.world.initSurfaceTable(1)
self.world.setSurfaceEntry(0, 0, 150, 0.0, 9.1, 0.9, 0.00001, 0.0, 0.002)

self.space = OdeSimpleSpace()
self.space.setAutoCollideWorld(self.world)
self.contactgroup = OdeJointGroup()
self.space.setAutoCollideJointGroup(self.contactgroup)

self.cm = CardMaker(“ground”)
self.cm.setFrame(-20, 20, -20, 20)
self.ground = render.attachNewNode(self.cm.generate())
self.ground.setPos(0, 0, 0); self.ground.lookAt(0, 0, -1)
self.groundGeom = OdePlaneGeom(self.space, Vec4(0, 0, 1, 0))

self.box = loader.loadModel(‘../assets/eggs/box_c.egg’)
self.box.reparentTo(render)
self.box.setPos(0,9.5,7)
self.box.setHpr(5,35,57)
self.box.setColor(0.5, 0.5, 0.5, 1)

self.boxBody = OdeBody(self.world)
self.boxMass = OdeMass()
self.boxMass.setBox(100,1,1,1)
self.boxBody.setMass(self.boxMass)
self.boxBody.setPosition(self.box.getPos(render))
self.boxBody.setQuaternion(self.box.getQuat(render))
#collision solid in physics world
self.boxGeom = OdeBoxGeom(self.space, 2,2,2)
self.boxGeom.setBody(self.boxBody)

# Set the camera position
base.disableMouse()
base.camera.setPos(40, 40, 20)
base.camera.lookAt(0, 0, 0)

#press ‘f’ key
self.accept(‘f’, self.applyForce)

self.taskMgr.doMethodLater(4, self.update, “update task”)

def update(self, task):
#mandatory
self.space.autoCollide()
self.world.quickStep(globalClock.getDt())

#update rendering system
self.box.setPosQuat(render, self.boxBody.getPosition(), Quat(self.boxBody.getQuaternion()))

#mandatory for collision events
self.contactgroup.empty()
return Task.cont

def fiatLux(self):

# Directional light 01
self.directionalLight = DirectionalLight(‘directionalLight’)
self.directionalLight.setColor(Vec4(0.95, 0.95, 0.8, 1))
self.directionalLightNP = render.attachNewNode(self.directionalLight)
# This light is facing backwards, towards the camera.
self.directionalLightNP.setHpr(45, -15, 0)
render.setLight(self.directionalLightNP)

def applyForce(self):
print “apply force!”
print self.boxBody.getMass()
self.boxBody.setForce(100000,0,0)

game = MyApp()

run()

[/code]

Files for Panda3D tutorial

Below you will find the files for the Panda3D tutorials.

Panda-project (15Mb .zip format)

Organizing project files.

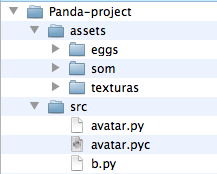
To the code files and the assets files work as expected, is required to organize them in a certain structured way, as illustrated below:

Panda3D_projectFolder
The role project must be inside a folder called Panda-project.

Down below Panda-project, there will be two folders assets and src. The assets folder will hold the art files for the project (models, textures, audio files, etc.). For that reason, this assets folder has three children folders: eggs, textures(texturas), audio(som) (the names are in Portuguese).

The src folder (src stands for source) is where we will save all our code files, named with .py extension.

Collisions :: Gamedev Panda3D cookbook

Detect collision between game objects is a crucial practice in (almost) any game. Beside collision detection, is also important to know what to do, when collisions occur.

Game engines, always provide collision detection features, and is very important to watch the “elements” used in this procedures.
Panda3D gives us:
– Collision handlers: out of the box behaviors to be use;
– Collision geometries (sphere, cube, plane, capsule, line, ray …);
– 3D mesh collisions;
– Collision events.

When a collision is detected, events are dispatched through out the system, and those events can be captured by game objects, and trigger some actions.

sample 1:

[code lang=”python”]
from direct.showbase.ShowBase import ShowBase
from direct.task import Task
from pandac.PandaModules import *

class MyApp(ShowBase):

def __init__(self):
ShowBase.__init__(self)

# Create a Traverser and Handlers: step one
base.cTrav = CollisionTraverser()
base.pusher = CollisionHandlerPusher()
base.pusher.addInPattern(‘%fn-into-%in’)

self.cube = self.loader.loadModel(“box”);
self.cube.reparentTo(self.render)
self.cube.setScale(1)
self.cube.setPos(-3,10,-2)

# create colliders: step two
self.cubeCSphere = CollisionNode(“cubeCSphere”)
self.cubeCSphere.addSolid( CollisionSphere(0,0,0, 1.05) )
self.cubeEsfNP = self.cube.attachNewNode(self.cubeCSphere)
self.cubeEsfNP.show()

# Point to the Traverser and to the Handler, which objects must be “watched” to capture it’s collisions: third step
base.cTrav.addCollider( self.cubeEsfNP, base.pusher )
base.pusher.addCollider( self.cubeEsfNP, self.cube )

self.smiley = loader.loadModel(‘smiley’)
self.smiley.reparentTo(self.render)
self.smiley.setScale(0.5);
self.smiley.setPos(3, 10, -1.5)

self.smileyCSphere = CollisionNode(“smileyCSphere”)
self.smileyCSphere.addSolid( CollisionSphere(0,0,0, 1.05) )
self.smileyEsfNP = self.smiley.attachNewNode(self.smileyCSphere)
self.smileyEsfNP.show()

self.taskMgr.add(self.taskFunction, “testing Task”)
self.accept(‘cubeCSphere-into-smileyCSphere’, self.collisionEvent)

def collisionEvent(self, entry):
print “Game objects did collide!!”
print entry

def taskFunction(self, task):
self.cube.setX(self.cube.getX()+0.05)
return Task.cont

app = MyApp()
app.run()
[/code]

In the sample above, a simple collision, between the cube and a smiley, is detected, and because a CollisionHandlerPusher were use as a collision handler, the objects do not cross each other. In addition, an event were dispatched, in order to trigger some action, in this case, an output with collision info were printed in the console.

Lets take a closer look at the Panda3D’s procedures steps:
1- Creation of CollisionTraverser and a CollisionHandler;
2- Creation of: CollisionNode and CollisionSolid;
3- Attach CollisionNodes and CollisionSolid to CollisionTraverser and CollisionHandler.

Steps:
Step 1:

# Creation of CollisionTraverser and a CollisionHandler: step one
base.cTrav = CollisionTraverser()
base.pusher = CollisionHandlerPusher()
base.pusher.addInPattern(‘%fn-into-%in’)

First thing, a CollisionTraveser is created; than, a CollisionHandler is created as a Pusher (the CollisionHandlerPusher do not allow game objects to pass through each other). In the third line, is added to the “Pusher”, an order to dispatch events when collisions occur.

Step 2:

# Creations of colliders: second step
self.cubeCSphere = CollisionNode(“cubeCSphere”)
self.cubeCSphere.addSolid( CollisionSphere(0,0,0, 1.05) )
self.cubeEsfNP = self.cube.attachNewNode(self.cubeCSphere)
self.cubeEsfNP.show()

This step is a bit more complicated.
Literally the code says:
– Create a collision node called “cubeCSphere”, and save the path to it, in the variable self.cubeCSphere;
– Add a collision solid sphere to the collision node “cubeCSphere”.
– Attach the collision node to cube node (self.cube), and save this node path in the variable self.cubeEsfNP.
– render the collision node (as a sphere were set as a collision solid, the engine will render a transparent sphere).

This commands are mandatory, except by the self.cubeEsfNP.show(), which serves only as a pre-view.

Observe that this steps must be set for each game object which will interact through collisions. For example, the smiley object also receives those collision nodes.

Step 3:

# Point to the Traverser and to the Handler, which objects must be “watched” to capture it’s collisions: third step
base.cTrav.addCollider( self.cubeEsfNP, base.pusher )
base.pusher.addCollider( self.cubeEsfNP, self.cube )

After setting the collision nodes (CollisionNode, steps 1 and 2), is absolutely required to inform the system how to deal with collisions.
The command: base.cTrav.addCollider( self.cubeEsfNP, base.pusher ), says the Traverser that collisions related to the collision node self.cubeEsfNP, must be treated by the handler “Pusher”.
The command: base.pusher.addCollider( self.cubeEsfNP, self.cube ), says to the “Pusher”, when collisions related to the collision node self.cubeEsfNP occurs, the “pusher” behavior, must be applied to the node self.cube.

This is a good example to be use in situations when objects can not pass through other objects, like an character can not pass through a wall.

The three steps we’ve seen thus far, show the basic set up for collisions in Panda3D. Now let’s see a interesting detail: how to dispatch events when collisions occur.

This is possible to be done in Panda3D, thanks to the CollisionHandlerEvent, that dispatches events when a collision is detected. The CollisionHandlerPusher is a subclass of CollisionHandlerEvent, as such, it inherits the collision events features.

When the CollisionHandlerPusher was created (step 1), pay attention at the command: base.pusher.addInPattern(‘%fn-into-%in’). This is the set up command that says to the Pusher, which patterns of collision can generate events.

See the line:
self.accept(‘cubeCSphere-into-smileyCSphere’, self.collisionEvent)
This line is the command used to capture events in the system, in this case, this event is gonna be generated by the Pusher when the cube collide into the smiley (‘cuboCEsfera-into-smileyCEsfera’), than we are gonna capture it, and do something in the self.collisionEvent function.

So, once the event is captured the function self.collisionEvent is called. Pay attention that when a collision event is captured, the function that deals with it, must be ready to deal with an argument “entry”, which gives you the many important informations about the collision itself, like coordinates, normals, etc.

sample 2:

[code lang=”python”]

from direct.showbase.ShowBase import ShowBase
from direct.task import Task
from pandac.PandaModules import *

class MyApp(ShowBase):

def __init__(self):
ShowBase.__init__(self)

# CCreation of CollisionTraverser and a CollisionHandler: step one
base.cTrav = CollisionTraverser()
base.event = CollisionHandlerEvent()
base.event.addInPattern(‘%fn-into-%in’)
base.event.addAgainPattern(‘%fn-again-%in’)
base.event.addOutPattern(‘%fn-outof-%in’)

self.cube = self.loader.loadModel(“box”);
self.cube.reparentTo(self.render)
self.cube.setScale(1)
self.cube.setPos(-3,10,-2)
# Create colliders: step two
self.cubeCSphere = CollisionNode(“cubeCSphere”)
self.cubeCSphere.addSolid( CollisionSphere(0,0,0, 1.05) )
self.cubeEsfNP = self.cube.attachNewNode(self.cubeCSphere)
self.cubeEsfNP.show()
#Point to the Traverser and to the Handler, which objects must be “watched” to capture it’s collisions: third step
base.cTrav.addCollider( self.cubeEsfNP, base.event )

self.smiley = loader.loadModel(‘smiley’)
self.smiley.reparentTo(self.render)
self.smiley.setScale(0.5);
self.smiley.setPos(0, 10, -1.5)

self.smileyCSphere = CollisionNode(“smileyCSphere”)
self.smileyCSphere.addSolid( CollisionSphere(0,0,0, 1.05) )
self.smileyEsfNP = self.smiley.attachNewNode(self.smileyCSphere)
self.smileyEsfNP.show()

self.taskMgr.add(self.taskFunction, “testing Task”)

#Capture Collision Events
self.accept(‘cubeCSphere-into-smileyCSphere’, self.collisionEventIN)
self.accept(‘cubeCSphere-again-smileyCSphere’, self.collisionEventAGAIN)
self.accept(‘cubeCSphere-outof-smileyCSphere’, self.collisionEventOUT)

def collisionEventIN(self, entry):
print “Objects did collide!!”
print entry

def collisionEventOUT(self, entry):
print “Objects did stop colliding!!”
print entry

def collisionEventAGAIN(self, entry):
print “Objects are still colliding!!”

def taskFunction(self, task):
self.cube.setX(self.cube.getX()+0.05)
return Task.cont

app = MyApp()
app.run()
[/code]

In this sample there is a demonstration of the usage of CollisionHandlerEvent. This collision handler do allow objects to pass through each other, so in this case, the cube will pass through the smiley with no problem.

The CollisionHandlerEvent, is a great way to create sensors around the game arena. For example, an avatar pass through a gate, and a trap is triggered.

Observe the changes in steps 1 and 3, and in the event capture set up.
The changes are small. The most import are when we create and when we capture the events. In this sample, not only we set up the ‘into’ event, but also we defined the ‘outof’ and the ‘again’.

Events “into”, occur when a game object collide into another.
Events “outof”, occur when game objects stop colliding each other.
Events “again”, occur when game objects are colliding.