Panda3D gamedev tutorial 4

In this tutorial, we will see how to work with simple physics simulations in Panda3D’s built in physics engine. This simulations will be applied in our avatar movement, and ability to jump. Also we will explore briefly, Panda3D’s Interval features.

This tutorial aims to show how to use in a simple way, a physics engine. Just in case you are interested in learn about the use of ODE in Panda, check out this tutorial: http://paulobarbeiro.com.br/blog/?p=77&lang=en, it might be helpful.

Bad news guys! A good amount of all our logic will be lost! Most of all the logic related to the avatar’s movement, described in previous tutorials, will no longer work with physics simulation. I hope that can teach you something: Do not feed emotional feeling to your code! 🙂 And think well if you want to use physics or not, because the code will not be the same!

The work in this tutorial will be a bit long. And to make it easy to understand, we will talk a bit about physics engines, and how to implement them, afterwards, we will implement our code.

Physics Engines ——————-

Physics engines are softwares dedicated to perform physics calculus, usually Newtonian physics, to many different applications, and games is one of them.

These game engines, has one single work: calculate physics. That’s all! Physics engines, do not render screens, do not capture user inputs, do not synthesize audio. They just perform calculus, based on physic formulas.

Each engine has a certain number of formulas, it’s up to you choose the engine based on the features you will need.

So, how they work? how to use them on games?

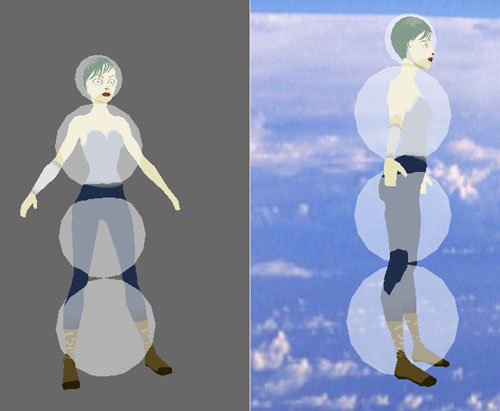
Till now, in our tutorials, we had change our avatar’s coordinates values in order to simulate it’s movements. To move the avatar towards the right side, we have incremented it’s x position. And this is an absolutely acceptable approach, as far as we do not concern to realistic movements.

Any one can see that our avatar, falls at a constant speed. Which is not a realistic fall. In our universe, gravity speeds up the fall. In order to achieve more realistic results, implement physics simulation is crucial.

So, what change when some physics engine is implemented? We do not touch the object coordinates! When some physics engine is been used, we think about movements as a result of forces been applied to the objects! That means: to an object move towards right, a force, pointing to right, must be applied to this object. And all the jobs is upon the engine. The object movement, will be a result of physics calculus, performed by the engine. Our job will be select, and calibrate the forces that will be applied.

Think in movement as a result of applied forces isn’t hard. But it demands a little knowledge, of how to describe this forces mathematically: Vectors. Everybody knows that! We all studied this subject at the school, is just a matter to remember! This link might help a little bit.

There are a huge number of content about vectors, vector operations, forces, vector forces, on internet, just google it!

Now, we have seen a bit of concepts in physics engines usage. Let’s see, conceptually, how to apply this concepts in our game.

Till now, our avatar moves in three directions: left, right, down. So, to make our avatar move in this directions, by forces, we will have:
– down: gravity force;
– right: a push force towards right;
– left: a push force towards left.

In case we want a jump, a push force towards up, will be needed. See the graph bellow:

grafo05

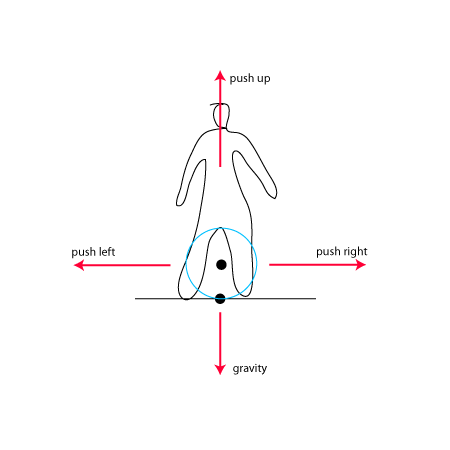
The graph above, shows the forces we will use, and their vector representation. For example, the gravity: Vec3(0,0,-9.81).
Those vector values, are XYZ “coordinates”. I gravity case: x=0, y=0, z=-9.81; that means, gravity pushed down, with 9.81 intensity (in Newtons).

In this tutorial, all forces are pointing to simple directions. See bellow:
– pushRight: Vec3(10,0,0): points to rightwards (x positive), intensity 10
– pushLeft: Vec3(-10,0,0): points leftwards (x negative), intensity 10
– pushUp: Vec3(0,0,20): point upwards (z positive), intensity 20

In our code, we will implement the basic Panda3D’s built in engine. During this process, we will see, how to implement the basic elements, and logic solution for problems.

Let’s start the first step. In Panda-tut-00.py file, we won’t change it much. In this main file, we just import and initialize the PhysicsCollisionHandler, which will be responsible for collision detections.

[code lang=”python”]
from pandac.PandaModules import loadPrcFileData
loadPrcFileData(”,’show-frame-rate-meter 1′)

import direct.directbase.DirectStart
from pandac.PandaModules import *

from direct.task.Task import Task
from direct.showbase.DirectObject import DirectObject

from avatar import Avatar

#game class
class Game(DirectObject):
def __init__(self):
#init collider system
traverser = CollisionTraverser()
base.cTrav = traverser
base.cTrav.setRespectPrevTransform(True)

base.pusher = CollisionHandlerPusher()
base.pusher.addInPattern(“%fn-into-%in”)
base.pusher.addOutPattern(“%fn-out-%in”)

base.physics = PhysicsCollisionHandler()
base.physics.addInPattern(“%fn-into-%in”)
base.physics.addOutPattern(“%fn-out-%in”)
base.enableParticles()

#load platform model
self.plataforma = loader.loadModel(“../assets/eggs/plataformaBase”)
self.plataforma.reparentTo(render)
self.plataforma.setPos(0,10,0)
#load background sky
self.wall = loader.loadModel(‘../assets/eggs/papelParede’)
self.wall.reparentTo(render)
self.wall.setScale(1)
self.wall.setPos(-5, 30, -2)
#avatar
avatar = Avatar()
avatar.setCollision(traverser)

game = Game()
run()
[/code]

Pay attention that in this code, we just add the lines 24, 25, 26, and 27. The PhysicsCollisionHandler works just like the other handlers, the mayor difference is that it requires the particle system activation (line 27). The CollisionHandlerPusher, will not work here, but I left those line, for you to compare handler pusher with handler physics.

Now in Avatar class, there ar lots of changes! The code is presented below, and than the explanations.

avatar class code
[code lang=”python”]
from direct.showbase.DirectObject import DirectObject
from direct.actor.Actor import Actor
from direct.task import Task
from pandac.PandaModules import *
from direct.interval.IntervalGlobal import *

#modulo da classe Avatar
class Avatar(DirectObject):
def __init__(self):
self.persona = render.attachNewNode(‘persona’)

self.personaActorNode = ActorNode(‘personaActorNode’)
self.personaActorNode.getPhysicsObject().setMass(35)
self.personaActorNP = self.persona.attachNewNode(self.personaActorNode)
base.physicsMgr.attachPhysicalNode(self.personaActorNode)

self.personaActor = Actor(‘../assets/eggs/personagem.egg’,
{‘idle’:’../assets/eggs/personagem-parado’,
‘run’ :’../assets/eggs/personagem-correr’,
‘jump’:’../assets/eggs/personagem-pular’}
)
self.personaActor.setScale(1)
self.personaActor.setPos(0,0,5)
self.personaActor.reparentTo(self.personaActorNP)

self.persona.setPos(0,10,10)
self.persona.setScale(.15)
self.persona.setH(90)

self.state = { ‘left’ :False,
‘right’ :False,
‘ground’:False,
‘canJump’ :False
}

taskMgr.add(self.movement, “Avatar Movement”)

#timer for jump
self.startCallforJump = 0
self.timer = LerpFunc(self.performJump,
fromData = 0,
toData =1,
duration = 0.25,
blendType=’easeIn’,
extraArgs=[],
name=None)

#capture keyboard events
self.accept(‘arrow_left’, self.changeState, [‘left’,True])
self.accept(‘arrow_left-up’, self.changeState, [‘left’,False])
self.accept(‘arrow_right’, self.changeState, [‘right’,True])
self.accept(‘arrow_right-up’, self.changeState, [‘right’,False])
self.accept(‘space’, self.changeState,[‘jump’,True])
self.accept(‘space-up’, self.changeState,[‘jump’,False])
#capture collision events
self.accept(‘bola0CN-into-plataforma’, self.changeState, [‘ground’,True ])
self.accept(‘bola0CN-out-plataforma’, self.changeState , [‘ground’,False])

#Persona physics forces
self.pushUp=LinearVectorForce(0,0,20)
self.pushUpFN = ForceNode(‘pushup-force’)
self.pushUpFNP = render.attachNewNode(self.pushUpFN)
self.pushUpFN.addForce(self.pushUp)

self.pushLeft=LinearVectorForce(-10,0,0)
self.pushLeftFN = ForceNode(‘pushleft-force’)
self.pushLeftFNP = render.attachNewNode(self.pushLeftFN)
self.pushLeftFN.addForce(self.pushLeft)

self.pushRight=LinearVectorForce(10,0,0)
self.pushRightFN = ForceNode(‘pushright-force’)
self.pushRightFNP = render.attachNewNode(self.pushRightFN)
self.pushRightFN.addForce(self.pushRight)

self.gravityFN=ForceNode(‘world-forces’)
self.gravityFNP=render.attachNewNode(self.gravityFN)
self.gravityForce=LinearVectorForce(0,0,-9.81) #gravity acceleration
self.gravityFN.addForce(self.gravityForce)

base.physicsMgr.addLinearForce(self.gravityForce)

def setCollision(self, trav):
#colision nodes and solids
self.ball0 = CollisionSphere(0,0,1.5,1.5)
self.ball0NP = self.personaActorNP.attachNewNode(CollisionNode(‘bola0CN’))
self.ball0NP.node().addSolid(self.ball0)
self.ball0NP.show()

base.physics.addCollider(self.ball0NP, self.personaActorNP)
base.cTrav.addCollider(self.ball0NP, base.physics)

def movement(self, task):
#print self.personaActorNode.getPhysical(0).getLinearForces()
if(self.state[‘left’] == True):
if(len(self.personaActorNode.getPhysical(0).getLinearForces()) == 0):
self.personaActorNode.getPhysical(0).addLinearForce(self.pushLeft)
else:
self.personaActorNode.getPhysical(0).removeLinearForce(self.pushLeft)

if(self.state[‘right’] == True):
if(len(self.personaActorNode.getPhysical(0).getLinearForces()) == 0):
self.personaActorNode.getPhysical(0).addLinearForce(self.pushRight)
else:
self.personaActorNode.getPhysical(0).removeLinearForce(self.pushRight)

return Task.cont

def changeState(self, key, value, col=None):
if(self.state[‘canJump’] == True and key == ‘jump’):
if(value==True):
self.startCallForJump = globalClock.getRealTime()
if(value == False):
preparationTime = globalClock.getRealTime() – self.startCallForJump
if (preparationTime > 0.4): preparationTime = 0.4
elif(preparationTime 0):
self.personaActorNode.getPhysical(0).removeLinearForce(self.pushUp)
[/code]

Lets start in function __init__(self):

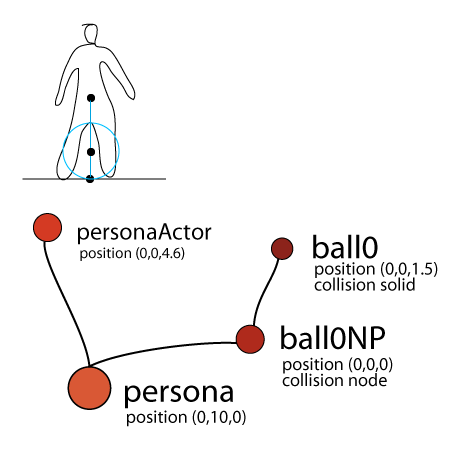
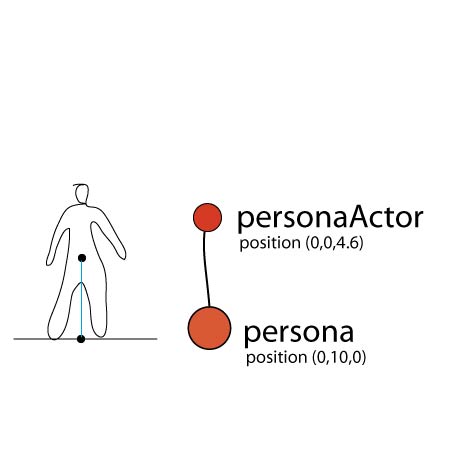
The first change here is to add an ActorNode to our avatar’s nodes structure. The ActoNode class is a special node class to be used in physics system. Do not confuse ActorNode with Actor class, which is used to play animation in rigged models.
First we create an ActoNode (line 5), than it’s mass is set; The ActorNode is attached to persona node, and the nodepath resulted is attached to physics handler.
Pay attention to another important detail, in line 17: the personaActor node (our model node), is attached to the ActorNode. This link will make the model move according physics simulations.

In lines 39 and 40, there is one variable and one function, that are gonna be used for avatar’s jump. More about it soon.
In lines 53 and 54, we capture the user input in space bar.

In lines 60 till 80, the forces to be applied in our avatar are set. In line 71, one of the forces is been applied, the gravity.

The forces are created as a vector force, the class LinearVectorForce, that contains the force direction and intensity. Also a ForceNode, attached to render, is needed.

The setCollision function:
Not much changes here. Note that now, collisionNodes are linked to PhysicsCollisionNode.

The movement function:
Here we have the logic that moves the avatar to left or right. Basically, the avatar state changes with user input, than this function applies the forces according this state changes. The methods addLinearForce() and removeLinearForce(), are pretty much self-explanatory, are they?

The changeState function:
In this function there is a special logic to avatar’s jump.
The avatar will perform the jump, when user releases the space bar, and the power of the jump, will vary depending on the time the user held the bar pressed.
When space bar is pressed the function evaluates if the avatar can jump (canJump = if the avatar is on the platform). Than the function evaluates if the key were pressed or released; If the key was pressed, the function stores the moment when the key was pressed; If the key was released, the function calculates the time it was pressed, than this value divides a value of 1000, than the result of such division is applied to the pushUp force, and finally a timer, that applies and removes, is started.

The performJump function:
This is a LerpFunction declared in line 40. This function is a sort of timer, that is used to apply the force, and in the next moment, remove it. A human jump, just like any other terrestrials animals, are resulting of one strong force application in one single moment. That is the reason the pushUp force must be removed so soon.

Conclusion??
Well, a simple conclusion?? You don’t need to use physics simulation if the resulting movement is not pleasing you! Physics is just another option! But, get yourself used to them. As more you know them, and better you apply the forces, better the results will look!

Panda3D gamedev tutorial 3


Collisions between objects in games, are an absurdly important point. Important because it is something crucial to game mechanics, and also for being a picky topic in computational terms. And this technical factor forces us to some reflections.

To calculate object’s collisions, with efficiency, involves a series of complex algorithms – which we will not get any deeper – that consume a lot of computational power. And in order to make this work possible in real time, is mandatory to simplify our object’s geometric descriptions. For example: In case we have a human head, collisions can not be calculated for every single head detail, like eyes, libs, cheek. We must simplify our head shape for a simples sphere, or tube, or some other very simple geometry shape. That is how collision can be calculated in real time.

These simple shapes, are called collision solids. Each game engine, has it’s own collision solids, and we must used them in this simplification process.
As an example, I made use of some spheres to describe a human body:

simplificacaoColisao

The image above, is just an example, this little project won’t need such description. At the moment we will need just one simple sphere close to our avatar’s feet, in order to detect collision between our avatar and the platform.

In Panda3D, we must set some objects required to collision calculations, the Collision Traverser, and the Collision Handler. Let’s add these objects, set some initial configuration, and solve the problems latter. Yes, we will face some issues! But all solvable.
First the file Panda-tut-00.py:

[code lang=”python”]
from pandac.PandaModules import loadPrcFileData
loadPrcFileData(”,’show-frame-rate-meter 1′)

import direct.directbase.DirectStart
from pandac.PandaModules import *

from direct.task.Task import Task
from direct.showbase.DirectObject import DirectObject

from avatar import Avatar

#game class
class Game(DirectObject):
def __init__(self):
#init collider system
traverser = CollisionTraverser()
base.cTrav = traverser

base.pusher = CollisionHandlerPusher()
base.pusher.addInPattern(“%fn-into-%in”)
base.pusher.addOutPattern(“%fn-out-%in”)

#load platform model
self.plataforma = loader.loadModel(“../assets/eggs/plataformaBase”)
self.plataforma.reparentTo(render)
self.plataforma.setPos(0,10,0)
#load background sky
self.wall = loader.loadModel(‘../assets/eggs/papelParede’)
self.wall.reparentTo(render)
self.wall.setScale(1)
self.wall.setPos(-5, 30, -2)
#avatar
avatar = Avatar()
avatar.setCollision(traverser)

game = Game()
run()
[/code]

What’s new here:
– In function __init__(self), we created the collision traverser and the collision handler (base.pusher)
– When the avatar is created, we have the line: avatar.setCollision(traverser). Here is where the avatar starts to set it’s collision properties.

Now, the Avatar class:

[code lang=”python”]
from direct.showbase.DirectObject import DirectObject
from direct.actor.Actor import Actor
from direct.task import Task
from pandac.PandaModules import *

#class Avatar
class Avatar(DirectObject):
def __init__(self):
self.persona = render.attachNewNode(‘persona’)
self.personaActor = Actor(‘../assets/eggs/personagem.egg’,
{‘idle’:’../assets/eggs/personagem-parado’,
‘run’ :’../assets/eggs/personagem-correr’,
‘jump’:’../assets/eggs/personagem-pular’}
)
self.personaActor.setScale(1)
self.personaActor.setPos(0,0,5)
self.personaActor.reparentTo(self.persona)

self.persona.setPos(0,10,0)
self.persona.setScale(.15)
self.persona.setH(90)

self.state = { ‘flying’:True,
‘left’ :False,
‘right’ :False
}

taskMgr.add(self.movement, “Avatar Movement”)

#capture keyboard events
self.accept(‘arrow_left’, self.changeState, [‘left’,True])
self.accept(‘arrow_left-up’, self.changeState, [‘left’,False])
self.accept(‘arrow_right’, self.changeState, [‘right’,True])
self.accept(‘arrow_right-up’, self.changeState, [‘right’,False])

def setCollision(self, trav):
#colision nodes and solids
self.ball0 = CollisionSphere(0,0,1.5,1.5)
self.ball0NP = self.persona.attachNewNode(CollisionNode(‘ball0CN’))
self.ball0NP.node().addSolid(self.ball0)
self.ball0NP.show()

trav.addCollider(self.ball0NP, base.pusher)
base.pusher.addCollider(self.ball0NP, self.persona)

def movement(self, task):
if(self.state[‘flying’] == True):
self.persona.setZ( self.persona.getZ() – 0.1 )
if(self.persona.getZ() < -2.3):
self.state[‘flying’]=False
#move sideways
else:
if(self.state[‘left’]):
self.persona.setX( self.persona.getX() – 0.1 )
elif(self.state[‘right’]):
self.persona.setX( self.persona.getX() + 0.1 )
return Task.cont

def changeState(self, key, value):
self.state[key] = value
[/code]

What’s new here:
– At the first lines, we have: from pandac.PandaModules import * . Here the tools needed for collision detection are imported.
– Between function __init__ and function movement, we get function setCollision.
– In function setCollision two node were created as children of persona node.
grafo04

setCollision function, is where avatar will gain it’s collision solid and a collision node, which is crucial to make collisions possible.

After this changes, you will see that the avatar will move in a very weird way through platform, but will be easy to realize that it is now creeping around the platform, in a very weird way, but that is the natural behavior of collision handler pusher, and we will fix it soon.

An import detail! SPECIALLY WHEN USING YOUR OWN 3D MODELS!!!

Til now, we set collision objects to our avatar, NOTHING WAS DONE TO CONFIGURE COLLISIONS FOR OUR PLATFORM!!
Actually, the plataforma.egg file were already configured for collisions, that’s why we did not configured it. Let’s take a look how it was made, and you will see how to make it in your own models.

We could set some collision solids for our platform, but for educational matter, I chose Collision Mesh. Collision Mesh, is how we can set our 3d model, as collision solid, with one limitation: your model must be simple and not concave!
So, with a simple and not concave 3D model in a 3D software, you must convert it to Panda3D format. After this process, you will have a .egg file, which is basically a structured text file like an XML, that you can open in any simple text editor, and modify it as you like. In order to make collisions with those .egg models we need to set the line <Collide>{Polyset keep descend} for each group.

The .egg structure is:
– first, information about materials in geometry;
– than a Group, is defined;
– the Group definition starts with it’s matrix (information about it’s position and rotation);
– than we have a list (Vertex Pool), with all vertices that make the geometry;
– finally, a list of the polygons made with the vertices listed above.

So the line <Collide>{Polyset keep descend}, must me included right down the group declaration. Take a look:

[code lang=”xml”]
piso {
{Polyset keep descend}
{
{
1.000000 0.000000 0.000000 0.000000
0.000000 11.226257 0.000000 0.000000
0.000000 0.000000 0.182287 0.000000
0.000000 0.000000 0.000000 1.000000
}
}
piso {
0 {
1.000000 11.226256 -0.182287
}
1 {
1.000000 -11.226257 -0.182287
}
[…]
22 {
-1.000000 11.226261 -0.182287
}
23 {
-1.000000 11.226257 0.182287
}
}
{
{ Material }
{ 0.000000 0.000000 -1.000000 }
{ 0 1 2 3 { piso } }
}
[ … ]
{
{ Material }
{ 0.000003 1.000000 0.000012 }
{ 20 21 22 23 { piso } }
}
}
[/code]

Back to implementation —————

Before start the implementation, let’s think about the CollisionHandlerPusher, and how collisions will fit out game.
As said before, the CollisionHandlerPusher, do not allow objects to pass through each other, so collision pusher, pushes the object back, or aside.

But another possibility with it is, generate collision events! Collision Handler Pusher, is a sub class of Collision Handler Event, so we can make event generation when objects collide.
In Panda-tut-00.py, lines 20 and 21, is the point where we set Collision Handler Pusher to generate collisions events.

Implementation —————

Now, our basic collision is set up, but we must work on some issues.
The first collision we have is our avatar hitting the platform. At the moment, we make it stop falling using a Z axis numeric clause. But to make it right, let’s make the collision, change our avatar state.

To start with, let’s kill lines 49 e 50, in avatar class:
[code lang=”python”]
if(self.persona.getZ() < -2.3):
self.state[‘flying’]=False
[/code]

We must change the self.state[‘flying’] to false, through collision between our sphere and the platform.
Now let’s create a new accept, for collision events:
[code lang=”python”]
self.accept(‘ball0CN-into-plataforma’, self.changeState, [‘flying’,False])
[/code]

In this line above, we say to Panda3D, to notify avatar when the ball0CN hits the ‘plataforma’. And the function self.chageState, will be called to treat the event.
To deeper understanding of this collision event generation, check this link.

But now we have a logic problem. All functions that deals with collisions, must receive the collision informations, as an argument. So we need to prepare our function to receive such argument. The problem lays on the fact that self.changeState, is also used to treat simple events (keyboard events), which do not demand and special argument. And if we insert a new argument in that function, and the function was called, and do not pass all required arguments, an error will be generated, and the software will be killed.

Fortunately, there is a trick to solve this problem in Python. We will insert a new argument in that function, but a default value will be set to it, in case nothing were passed to the function. In this case, let’s insert a new argument called ‘col’ (small version for ‘collision’), and give to it a default value of ‘None’ (null in python):
[code lang=”python”]
def changeState(self, key, value, col=None):
self.state[key] = value
[/code]

At the end of this process, run the program, and you will see that the avatar stops falling, thanks to collision detection. But we still have a problem, the avatar seems to slide over the platform! That is a effect of Handler Pusher. To solve this problem we will “hard” set our avatar X and Y position.
Take a look at the final code:

[code lang=”python”]
from direct.showbase.DirectObject import DirectObject
from direct.actor.Actor import Actor
from direct.task import Task
from pandac.PandaModules import *

#class Avatar
class Avatar(DirectObject):
def __init__(self):
self.persona = render.attachNewNode(‘persona’)
self.personaActor = Actor(‘../assets/eggs/personagem.egg’,
{‘idle’:’../assets/eggs/personagem-parado’,
‘run’ :’../assets/eggs/personagem-correr’,
‘jump’:’../assets/eggs/personagem-pular’}
)
self.personaActor.setScale(1)
self.personaActor.setPos(0,0,5)
self.personaActor.reparentTo(self.persona)

self.persona.setPos(0,10,0)
self.persona.setScale(.15)
self.persona.setH(90)

self.state = { ‘flying’:True,
‘left’ :False,
‘right’ :False
}
self.lastXpos = 0;

taskMgr.add(self.movement, “Avatar Movement”)

#capture keyboard events
self.accept(‘arrow_left’, self.changeState, [‘left’,True])
self.accept(‘arrow_left-up’, self.changeState, [‘left’,False])
self.accept(‘arrow_right’, self.changeState, [‘right’,True])
self.accept(‘arrow_right-up’, self.changeState, [‘right’,False])
self.accept(‘ball0CN-into-plataforma’, self.changeState, [‘flying’,False])
self.accept(‘ball0CN-out-plataforma’, self.changeState, [‘flying’,True])

def setCollision(self, trav):
#colision nodes and solids
self.ball0 = CollisionSphere(0,0,1.5,1.5)
self.ball0NP = self.persona.attachNewNode(CollisionNode(‘ball0CN’))
self.ball0NP.node().addSolid(self.ball0)
self.ball0NP.show()

trav.addCollider(self.ball0NP, base.pusher)
base.pusher.addCollider(self.ball0NP, self.persona)

def movement(self, task):
if(self.state[‘flying’] == True):
self.persona.setZ( self.persona.getZ() – 0.06 )
#move sideways
else:
if(self.state[‘left’]):
self.persona.setX( self.persona.getX() – 0.1 )
elif(self.state[‘right’]):
self.persona.setX( self.persona.getX() + 0.1 )
else:
self.persona.setX(self.lastXpos)
if(self.persona.getY() != 10):
self.persona.setY(10)
return Task.cont

def changeState(self, key, value, col=None):
self.state[key] = value
if(value == 0):
self.lastXpos = self.persona.getX()
[/code]

Basically, in function movement, we check if avatar’s Y position is different than 10, if is true, we set it to 10. It will solve the avatar sliding in Y axis. But it still slide on X axis. To solve this, we create a variable lastXpos, which will position the avatar in the proper X position. When the avatar is in touch with the platform, and not moving to right or left, it will be positioned in lastXpos. This variable is updated, every time the avatar will stop moving: See function self.changeState, when the ‘value’ is 0(zero), the lastXpos is updated with the avatar’s current position.

Panda3D gamedev tutorial 2

In this second tutorial we will create our avatar, and set up some Panda3D features for interaction: tasks and user inputs.
In Python code, we will see how to work with python modules, some conditionals and dictionaries.

Why is this python module necessary? Well, our code will start growing in size, and keeping classes in different files are really good to make our development easier. And this is a very easy thing to do: just open a new code file into our Panda-project/src folder named avatar.py, and let’s start with a very simple code for it:

[code lang=”python”]
from direct.showbase.DirectObject import DirectObject
from direct.actor.Actor import Actor

#modulo da classe Avatar
class Avatar(DirectObject):
def __init__(self):
self.persona = render.attachNewNode(‘persona’)
self.personaActor = Actor(‘../assets/eggs/personagem.egg’,
{‘idle’:’../assets/eggs/personagem-parado’,
‘run’ :’../assets/eggs/personagem-correr’,
‘jump’:’../assets/eggs/personagem-pular’}
)

self.personaActor.setPos(0,0,4.6)
self.personaActor.reparentTo(self.persona)

self.persona.setPos(0,10,0)
self.persona.setH(90)
self.persona.setScale(.1)
[/code]

Let’s see the new things in this code:
1 – from direct.actor.Actor import Actor
::> this is the Panda3D class, that deals with rigging animated models, which is the avatar female 3D model.

2 – self.persona = render.attachNewNode(‘persona’)
::> here we create a new node, that will host the model node. We will need this, because in future, we will add some other sub-nodes, and let’s keep them organized.

3 – self.personaActor = Actor(‘../assets/eggs/personagem.egg’,
::> in this lines, we create our Actor, based on our personagem.egg model file.

4 – {‘idle’:’../assets/eggs/personagem-parado’,
‘run’ :’../assets/eggs/personagem-correr’,
‘jump’:’../assets/eggs/personagem-pular’}
)
::> in this lines we inform our Actor class, which animations we want to load. This is a Python dictionary. You can notice ‘idle’ is a key, and ‘../assets/eggs/personagem-parado’ is the value. That means we want the ‘idle’ animation to be the animation in the “personagem-parado.egg” file. This is repeated to all animations we need.

5 – self.persona.setH(90)
::> this is a command to rotate the avatar. Try to comment this line, and see what happens.

To make easier to understant what is going on, take a look at the image below, to see how the Avatar’s nodes are organized:
Panda3D-sceneGraph_01
So, what we have, is a personaActor node, linked to persona node. The personaActor node will host our 3D model, linked to persona, and positioned a little above the persona node.

The next image show how is organized our whole graph til now:
Panda3D-sceneGraph_02

Now we need to import this module into the main file, Panda-tut-00.py, take a look:

[code lang=”python”]
from pandac.PandaModules import loadPrcFileData
loadPrcFileData(”,’show-frame-rate-meter 1′)

import direct.directbase.DirectStart
from pandac.PandaModules import *

from direct.task.Task import Task
from direct.showbase.DirectObject import DirectObject

from avatar import Avatar

#game class
class Game(DirectObject):
def __init__(self):
#load platform
self.platform = loader.loadModel(“../assets/eggs/plataformaBase”)
self.platform.reparentTo(render)
self.platform.setPos(0,10,0)
#background
self.wall = loader.loadModel(‘../assets/eggs/papelParede’)
self.wall.reparentTo(render)
self.wall.setScale(1)
self.wall.setPos(-5, 30, -2)

#avatar
self.avatar = Avatar()

game = Game()
run()
[/code]

Captura_de_tela-1At the end we will have a screen more or less like that.
From now on, all code relative to our avatar object, will be written in this module avatar.py. Let’s start creating a very simple and imperfect logic. It’s gonna be imperfect for games, and we’ll need to correct it in future, but is good enough for educational purpose. The logic will folow this rules:

– avatar falls, if it is not in contact with the platform;
– when avatar is in contact with the platform, it can moves to right or left;
– when user presses the left, or right key, the avatar chages position;

For that small logic, we’ll need a function to whatch for avatar’s states, and decide, when move the avatar. We will need avatar states as well!
Also, we will have a TASK! Tasks are functions used in Panda3D, which refer to: “The need to provide for certain game objects, execution loops.” It means, task allows us to create calls for functions every single frame! For further details take a look here!

The code for avatar module will be like that:
[code lang=”python”]
from direct.showbase.DirectObject import DirectObject
from direct.actor.Actor import Actor
from direct.task import Task

#module Avatar
class Avatar(DirectObject):
def __init__(self):
self.persona = render.attachNewNode(‘persona’)
self.personaActor = Actor(‘../assets/eggs/personagem.egg’,
{‘idle’:’../assets/eggs/personagem-parado’,
‘run’ :’../assets/eggs/personagem-correr’,
‘jump’:’../assets/eggs/personagem-pular’}
)
self.personaActor.setScale(.3)
self.personaActor.setPos(0,0,1.5)
self.personaActor.reparentTo(self.persona)

self.persona.setPos(0,30,0)
self.persona.setH(90)

self.state = { ‘flying’:True,
‘left’ :False,
‘right’ :False
}

taskMgr.add(self.movement, “Avatar Movement”)

def movement(self, task):
if(self.state[‘flying’] == True):
self.persona.setZ( self.persona.getZ() – 0.1 )
return Task.cont
[/code]

What’s new here:
1 – A state dictionary: self.state = {‘flying’:True, ‘left’:False, ‘right’:False}
::> It will host information of the current state of the avatar, which is gonna be watched for actions. The ‘flying’ state is the only one set as True, because at the very begining the avatar is out of the platform.
2 – We have a task manager: taskMgr.add(self.movement, “Avatar Movement”)
::> In this task manager, we’ve set the function self.movement to be called ate every single frame, and it is named as “Avatar Movement” task.
3 – A new function: def movement(self, task):
::> That is the function called by task manager.
Once this function is used by the task system, it must receive a ‘task’ argument, and return a Task constant, in this case Task.cont, which means we want the task manager keep calling this function.
Also, we have a simple logic inside this function. This logic evaluates is the state ‘flyign’ is true, in case yes, it changes the persona’s Z position, giving the illusion the avatar is falling.

But at this moment, running this code, you will see that the avatar falls none stop! So let’s make it to stop falling when it hits the platform’s z position. Bellow you will see the new movement function:

[code lang=”python”]
def movement(self, task):
if(self.state[‘flying’] == True):
self.persona.setZ( self.persona.getZ() – 0.1 )
if(self.persona.getZ() < -2.25):#condition to set ‘flying’ to False
self.state[‘flying’]=False
[/code]

This change in code, makes the flying state be set to False, when the persona’s z position hit the value -2.25, and than it stops falling, because if ‘flying’ state is not True, it position in z axis will not me chaged.

Now we have a very simple example about how create some logic based on boolean and integer values. Soon, this code will be changed in order to solve some issues.

User Inputs ————
Let’s add User Inputs, to allow the user to move the avatar sideways according directional keys are pressed. You can see more details about user inputs here.

In Panda3D user inputs are events sent throughout the system, in order to use them we need:
– declare which object must be notified, when certain events occur: accept()
– define functions to execute the actions we want.

Take a look the changes in avatar code, let’s talk about it latter:

[code lang=”python”]
from direct.showbase.DirectObject import DirectObject
from direct.actor.Actor import Actor
from direct.task import Task

#modulo da classe Avatar
class Avatar(DirectObject):
def __init__(self):
self.persona = render.attachNewNode(‘persona’)
self.personaActor = Actor(‘../assets/eggs/personagem.egg’,
{‘idle’:’../assets/eggs/personagem-parado’,
‘run’ :’../assets/eggs/personagem-correr’,
‘jump’:’../assets/eggs/personagem-pular’}
)
self.personaActor.setScale(1)
self.personaActor.setPos(0,0,5)
self.personaActor.reparentTo(self.persona)

self.smiley = loader.loadModel(‘smiley’)
self.smiley.reparentTo(self.persona)
self.smiley.setPos(0,0,0)
self.smiley.setScale(.2)

self.persona.setPos(0,10,0)
self.persona.setScale(.15)
self.persona.setH(90)

self.state = { ‘flying’:True,
‘left’ :False,
‘right’ :False
}

taskMgr.add(self.movement, “Avatar Movement”)

#capture keyboard events
self.accept(‘arrow_left’, self.changeState, [‘left’,True])
self.accept(‘arrow_left-up’, self.changeState, [‘left’,False])
self.accept(‘arrow_right’, self.changeState, [‘right’,True])
self.accept(‘arrow_right-up’, self.changeState, [‘right’,False])

def movement(self, task):
if(self.state[‘flying’] == True):
self.persona.setZ( self.persona.getZ() – 0.1 )
if(self.persona.getZ() < -2.3):
self.state[‘flying’]=False
#move sideways
else:
if(self.state[‘left’]):
self.persona.setX( self.persona.getX() – 0.1 )
elif(self.state[‘right’]):
self.persona.setX( self.persona.getX() + 0.1 )
return Task.cont

def changeState(self, key, value):
self.state[key] = value
[/code]

The new things here take place bellow line 34.
In lines 35, 36, 37 and 38, we inform Panda3D, that our avatar must be notified when left and right arrow are pressed (‘arrow_left’ / ‘arrow_right’) and released (‘arrow_left-up’ / ‘arrow_right-up’).
Lately, the function self.changeState is set as the function that will be called every time the avatar is notified that the event did occur. In addition python lists ([‘left’,True], [‘left’,False], [‘right’,True] and [‘right’,False]) are sent to the function as parameters.

The changeState function task is very simple: change the avatar state.
The function is prepared to receive two arguments, key and value, that relates to the python dictionary keys and values. So the key argument, will always be a string (‘left’, ‘right’, or even ‘flying’), and the value argument will alway be a boolean value. Pay attention that these parameters are the python lists defined in self.accept command ( [‘left’, True] … [‘right’,False])

To finish this logic up, and make possible the avatar change it’s position on screen, in movement function, there is a logic that evaluates when the state[‘left’] or state[‘right’] are True, in order to change persona node position along X axis.

Yes!! We have interactivity! Really bad interactivity, but it works.

Collisions ———-
In the next post, we will improve a lot our code!
As you can see, we have a huge problem: our avatar passes through our objects!
To solve that, we must implement collisions.
WARNING: in next implementations, our code will gain a lot of complexity.