In this second tutorial we will create our avatar, and set up some Panda3D features for interaction: tasks and user inputs.
In Python code, we will see how to work with python modules, some conditionals and dictionaries.
Why is this python module necessary? Well, our code will start growing in size, and keeping classes in different files are really good to make our development easier. And this is a very easy thing to do: just open a new code file into our Panda-project/src folder named avatar.py, and let’s start with a very simple code for it:
[code lang=”python”]
from direct.showbase.DirectObject import DirectObject
from direct.actor.Actor import Actor
#modulo da classe Avatar
class Avatar(DirectObject):
def __init__(self):
self.persona = render.attachNewNode(‘persona’)
self.personaActor = Actor(‘../assets/eggs/personagem.egg’,
{‘idle’:’../assets/eggs/personagem-parado’,
‘run’ :’../assets/eggs/personagem-correr’,
‘jump’:’../assets/eggs/personagem-pular’}
)
self.personaActor.setPos(0,0,4.6)
self.personaActor.reparentTo(self.persona)
self.persona.setPos(0,10,0)
self.persona.setH(90)
self.persona.setScale(.1)
[/code]
Let’s see the new things in this code:
1 – from direct.actor.Actor import Actor
::> this is the Panda3D class, that deals with rigging animated models, which is the avatar female 3D model.
2 – self.persona = render.attachNewNode(‘persona’)
::> here we create a new node, that will host the model node. We will need this, because in future, we will add some other sub-nodes, and let’s keep them organized.
3 – self.personaActor = Actor(‘../assets/eggs/personagem.egg’,
::> in this lines, we create our Actor, based on our personagem.egg model file.
4 – {‘idle’:’../assets/eggs/personagem-parado’,
‘run’ :’../assets/eggs/personagem-correr’,
‘jump’:’../assets/eggs/personagem-pular’}
)
::> in this lines we inform our Actor class, which animations we want to load. This is a Python dictionary. You can notice ‘idle’ is a key, and ‘../assets/eggs/personagem-parado’ is the value. That means we want the ‘idle’ animation to be the animation in the “personagem-parado.egg” file. This is repeated to all animations we need.
5 – self.persona.setH(90)
::> this is a command to rotate the avatar. Try to comment this line, and see what happens.
To make easier to understant what is going on, take a look at the image below, to see how the Avatar’s nodes are organized:
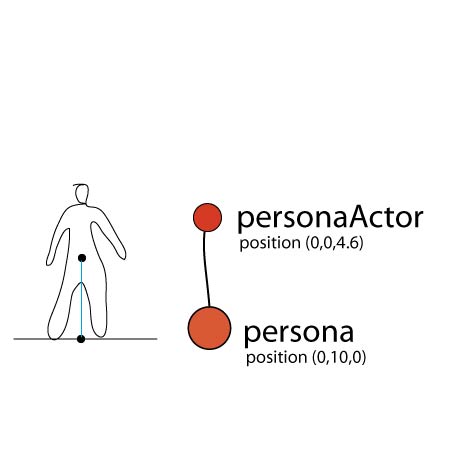
So, what we have, is a personaActor node, linked to persona node. The personaActor node will host our 3D model, linked to persona, and positioned a little above the persona node.
The next image show how is organized our whole graph til now:

Now we need to import this module into the main file, Panda-tut-00.py, take a look:
[code lang=”python”]
from pandac.PandaModules import loadPrcFileData
loadPrcFileData(”,’show-frame-rate-meter 1′)
import direct.directbase.DirectStart
from pandac.PandaModules import *
from direct.task.Task import Task
from direct.showbase.DirectObject import DirectObject
from avatar import Avatar
#game class
class Game(DirectObject):
def __init__(self):
#load platform
self.platform = loader.loadModel(“../assets/eggs/plataformaBase”)
self.platform.reparentTo(render)
self.platform.setPos(0,10,0)
#background
self.wall = loader.loadModel(‘../assets/eggs/papelParede’)
self.wall.reparentTo(render)
self.wall.setScale(1)
self.wall.setPos(-5, 30, -2)
#avatar
self.avatar = Avatar()
game = Game()
run()
[/code]
 At the end we will have a screen more or less like that.
From now on, all code relative to our avatar object, will be written in this module avatar.py. Let’s start creating a very simple and imperfect logic. It’s gonna be imperfect for games, and we’ll need to correct it in future, but is good enough for educational purpose. The logic will folow this rules:
– avatar falls, if it is not in contact with the platform;
– when avatar is in contact with the platform, it can moves to right or left;
– when user presses the left, or right key, the avatar chages position;
For that small logic, we’ll need a function to whatch for avatar’s states, and decide, when move the avatar. We will need avatar states as well!
Also, we will have a TASK! Tasks are functions used in Panda3D, which refer to: “The need to provide for certain game objects, execution loops.” It means, task allows us to create calls for functions every single frame! For further details take a look here!
The code for avatar module will be like that:
[code lang=”python”]
from direct.showbase.DirectObject import DirectObject
from direct.actor.Actor import Actor
from direct.task import Task
#module Avatar
class Avatar(DirectObject):
def __init__(self):
self.persona = render.attachNewNode(‘persona’)
self.personaActor = Actor(‘../assets/eggs/personagem.egg’,
{‘idle’:’../assets/eggs/personagem-parado’,
‘run’ :’../assets/eggs/personagem-correr’,
‘jump’:’../assets/eggs/personagem-pular’}
)
self.personaActor.setScale(.3)
self.personaActor.setPos(0,0,1.5)
self.personaActor.reparentTo(self.persona)
self.persona.setPos(0,30,0)
self.persona.setH(90)
self.state = { ‘flying’:True,
‘left’ :False,
‘right’ :False
}
taskMgr.add(self.movement, “Avatar Movement”)
def movement(self, task):
if(self.state[‘flying’] == True):
self.persona.setZ( self.persona.getZ() – 0.1 )
return Task.cont
[/code]
What’s new here:
1 – A state dictionary: self.state = {‘flying’:True, ‘left’:False, ‘right’:False}
::> It will host information of the current state of the avatar, which is gonna be watched for actions. The ‘flying’ state is the only one set as True, because at the very begining the avatar is out of the platform.
2 – We have a task manager: taskMgr.add(self.movement, “Avatar Movement”)
::> In this task manager, we’ve set the function self.movement to be called ate every single frame, and it is named as “Avatar Movement” task.
3 – A new function: def movement(self, task):
::> That is the function called by task manager.
Once this function is used by the task system, it must receive a ‘task’ argument, and return a Task constant, in this case Task.cont, which means we want the task manager keep calling this function.
Also, we have a simple logic inside this function. This logic evaluates is the state ‘flyign’ is true, in case yes, it changes the persona’s Z position, giving the illusion the avatar is falling.
But at this moment, running this code, you will see that the avatar falls none stop! So let’s make it to stop falling when it hits the platform’s z position. Bellow you will see the new movement function:
[code lang=”python”]
def movement(self, task):
if(self.state[‘flying’] == True):
self.persona.setZ( self.persona.getZ() – 0.1 )
if(self.persona.getZ() < -2.25):#condition to set ‘flying’ to False
self.state[‘flying’]=False
[/code]
This change in code, makes the flying state be set to False, when the persona’s z position hit the value -2.25, and than it stops falling, because if ‘flying’ state is not True, it position in z axis will not me chaged.
Now we have a very simple example about how create some logic based on boolean and integer values. Soon, this code will be changed in order to solve some issues.
User Inputs ————
Let’s add User Inputs, to allow the user to move the avatar sideways according directional keys are pressed. You can see more details about user inputs here.
In Panda3D user inputs are events sent throughout the system, in order to use them we need:
– declare which object must be notified, when certain events occur: accept()
– define functions to execute the actions we want.
Take a look the changes in avatar code, let’s talk about it latter:
[code lang=”python”]
from direct.showbase.DirectObject import DirectObject
from direct.actor.Actor import Actor
from direct.task import Task
#modulo da classe Avatar
class Avatar(DirectObject):
def __init__(self):
self.persona = render.attachNewNode(‘persona’)
self.personaActor = Actor(‘../assets/eggs/personagem.egg’,
{‘idle’:’../assets/eggs/personagem-parado’,
‘run’ :’../assets/eggs/personagem-correr’,
‘jump’:’../assets/eggs/personagem-pular’}
)
self.personaActor.setScale(1)
self.personaActor.setPos(0,0,5)
self.personaActor.reparentTo(self.persona)
self.smiley = loader.loadModel(‘smiley’)
self.smiley.reparentTo(self.persona)
self.smiley.setPos(0,0,0)
self.smiley.setScale(.2)
self.persona.setPos(0,10,0)
self.persona.setScale(.15)
self.persona.setH(90)
self.state = { ‘flying’:True,
‘left’ :False,
‘right’ :False
}
taskMgr.add(self.movement, “Avatar Movement”)
#capture keyboard events
self.accept(‘arrow_left’, self.changeState, [‘left’,True])
self.accept(‘arrow_left-up’, self.changeState, [‘left’,False])
self.accept(‘arrow_right’, self.changeState, [‘right’,True])
self.accept(‘arrow_right-up’, self.changeState, [‘right’,False])
def movement(self, task):
if(self.state[‘flying’] == True):
self.persona.setZ( self.persona.getZ() – 0.1 )
if(self.persona.getZ() < -2.3):
self.state[‘flying’]=False
#move sideways
else:
if(self.state[‘left’]):
self.persona.setX( self.persona.getX() – 0.1 )
elif(self.state[‘right’]):
self.persona.setX( self.persona.getX() + 0.1 )
return Task.cont
def changeState(self, key, value):
self.state[key] = value
[/code]
The new things here take place bellow line 34.
In lines 35, 36, 37 and 38, we inform Panda3D, that our avatar must be notified when left and right arrow are pressed (‘arrow_left’ / ‘arrow_right’) and released (‘arrow_left-up’ / ‘arrow_right-up’).
Lately, the function self.changeState is set as the function that will be called every time the avatar is notified that the event did occur. In addition python lists ([‘left’,True], [‘left’,False], [‘right’,True] and [‘right’,False]) are sent to the function as parameters.
The changeState function task is very simple: change the avatar state.
The function is prepared to receive two arguments, key and value, that relates to the python dictionary keys and values. So the key argument, will always be a string (‘left’, ‘right’, or even ‘flying’), and the value argument will alway be a boolean value. Pay attention that these parameters are the python lists defined in self.accept command ( [‘left’, True] … [‘right’,False])
To finish this logic up, and make possible the avatar change it’s position on screen, in movement function, there is a logic that evaluates when the state[‘left’] or state[‘right’] are True, in order to change persona node position along X axis.
Yes!! We have interactivity! Really bad interactivity, but it works.
Collisions ———-
In the next post, we will improve a lot our code!
As you can see, we have a huge problem: our avatar passes through our objects!
To solve that, we must implement collisions.
WARNING: in next implementations, our code will gain a lot of complexity.