This is the first post about game development in Panda3D. (version 1.6)
My idea is to introduce people in game development, I have chosen Panda3D as game engine, because it is a great software, free and multi-platform.
In order to start following these tutorials, you will need to download some files, and follow some instructions about how organize the files. Here is the link.
The goal here is to build a very simple game: A girl, in a futuristic scenario, who needs to avoid some barriers and traps.
I hope you already have Panda3D 1.6.2, otherwise, go to www.panda3d.org, download and install it. (There is some issue with MacOSX version, check forum to find solutions)
… let’s start.
To start writing Panda3D code all you need is a simple text editor, Microsoft Word or Open Office Writer do not work for this!
In case you work on Linux, Gedit is great!
In case you work on Mac, Xcode is… is ok, but…
In case you work on Windows, you should try Notepad++
But for all, I suggest Eclipse with python plugin (you can download Eclipse for PHP), it is a bit hard to setup, but it worth the effort.
So… if you are ready, let’s go and write some code. Start a new file, we could name it as Panda-tut-00.py, and write the following code:
[code lang=”python”]
import direct.directbase.DirectStart
run()
[/code]
This is the most simple code we can write to test if Panda3D is working!
The first line imports the DirectStart class, that starts Panda3D basic systems, and creates the screen where our game is gonna happened.
The line run(), basically starts the Panda3D main loop. Every game needs a main loop. The main loop, is a magical stuff that will give our game the “Frames”! And thanks for the frames per second, we can change game objects position in time, and all the magic is possible.
In order to run this simple code you have to:
In case you work on Linux (you know what to do, but…), you go to the Terminal, navigate to Panda-project/src folder, and run: python Panda-tut-00.py
In case you work on Mac (I think you know what to do…), you go to the Terminal, navigate to Panda-project/src folder, and run: python Panda-tut-00.py
In case you work on Windows (ohh… dear Lord, that God have mercy of your soul!)… You need to remember how to navigate using the Command Prompt, and the command ‘cd’. To start Command Prompt, go to Start menu >> All Programs >> Accessories >> Command Prompt, and navigate till the Panda-project/src folder, and run the command: python Panda-tut-00.py
…and that’s how you are gonna run and test, all our codes! You must know this process by heart!
Ok… let’s start for real!
Let’s start a real code… the previous was just to lay down some basis. Let’s start loading our scenario, our arena:
[code lang=”python”]
from pandac.PandaModules import loadPrcFileData
loadPrcFileData(”,’show-frame-rate-meter 1′)
import direct.directbase.DirectStart
from pandac.PandaModules import *
from direct.task.Task import Task
from direct.showbase.DirectObject import DirectObject
#game class
class Game(DirectObject):
def __init__(self):
#load platform model
self.platform = loader.loadModel(“../assets/eggs/plataformaBase”)
self.platform.reparentTo(render)
self.platform.setPos(0,10,0)
#load background sky
self.wall = loader.loadModel(‘../assets/eggs/papelParede’)
self.wall.reparentTo(render)
self.wall.setScale(1)
self.wall.setPos(-5, 30, -2)
game = Game()
run()
[/code]
After running this code, you should see some thing like this:
JUST TO REMEMBER: this is a computer code, so, none errors in typing are tolerated. One single wrong letter, might cause an error. Also, another common error occurs when Panda3D do not find the models, we are asking him to bring to the game! So… follow the instructions here.
Let’s see what we have done:
1 – Are you seeing that little number on top-right corner? Those are your frames per second! and the first two lines are responsible for it to appear:
[code lang=”python”]
from pandac.PandaModules import loadPrcFileData
loadPrcFileData(”,’show-frame-rate-meter 1′)
[/code]
2 – Now we need to inform Panda3D, which “parts” of it we need for the job. Panda3D is very big tool, and we don’t need all of it’s parts all the time… so we are asking it to give us some of it’s tools:
[code lang=”python”]
import direct.directbase.DirectStart
from pandac.PandaModules import *
from direct.task.Task import Task
from direct.showbase.DirectObject import DirectObject
[/code]
3 – As we are good people, we will create our code using object oriented programming, it means that all our game objects will be created in deferent parts of code. To start with our own game logic, will be and object itself, for that we define a class for it:
[code lang=”python”]
class Game(DirectObject):
def __init__(self):
self.platform = loader.loadModel(“../assets/eggs/plataformaBase”)
self.platform.reparentTo(render)
self.platform.setPos(0,10,0)
self.wall = loader.loadModel(‘../assets/eggs/papelParede’)
self.wall.reparentTo(render)
self.wall.setScale(1)
self.wall.setPos(-5, 30, -2)
[/code]
4 – We must instantiate our game class, into an object, and run it:
[code lang=”python”]
game = Game()
run()
[/code]
Crucial point
At this point we must talk about what is going on inside the class Game. The Game class has an initialize function def __init__(self):
This function is called once when the object is been instantiated, so inside this function, we write all the code we need to set up or game object. At the moment, we just brought to the game our arena and a background. Let’s watch the self.platform.
First we tell Panda3D to load the “plataformaBase” model, and put it’s path into self.platform variable. Than, we reparent the platform to the ‘render’, and finally we give platform a position.
Why this is a crucial point? First because this is the basic step, to load whatever you want into the game. But above that, we must understand what is this ‘render’?
The ‘render’ object is Panda3D scene graph’s top node! Was that explanation enough for you? Greate! Skip to the next chapter. If that definition wasn’t enough for you, pay attention to the explanation.
First of all, what is a scene graph? A scene graph is a structure to organize hierarchically the elements of a scene.
Almost all graphic softwares I know use a scene graph. Basically a scene graph starts with a main object, which points to other objects that are included into the scene. Such structure is used to optimize rendering processes, comunications among elements, collisions, etc. Take a look at this link, and this one!
Basically any object we want to appear in the game scene, must be some how linked to the scene graph. This object can be linked straight to the “render” node, or linked to an object which must be linked to “render”.
Each element we add to the scene graph, we create a Node and a NodePath. The node is created into the scene graph, and the path to this node (nodepath) is stored into a variable we name, in python code. Node and nodepaths, are not the same thing, but in Panda3D, nodepaths are much more used than the node itself. So, when the code says : self.platform = loader.loadModel(“../assets/eggs/plataformaBase”), Panda3D, loads a model, and creates a scene graph node, and save a path to this node in the self.platform variable.
Latter, in order to make this model visable, it’s necessary to link this new node to the render: self.platform.reparentTo(render).
Well, the “render” is the top node on Panda3D scene graph, and it is the center, the origin point of Panda3D’s coordinates system. So, after having the model imported, and linked to the scene graph, we can set a position to it: self.platform.setPos(0,10,0)
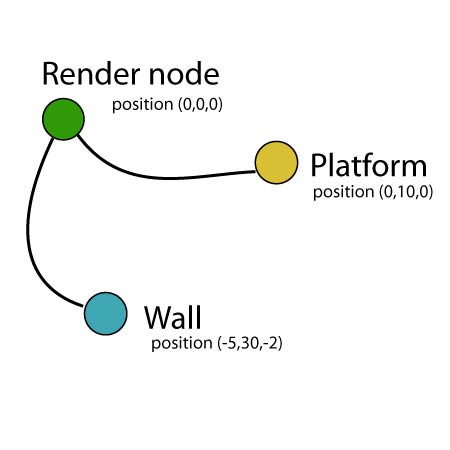
This process is repeated to all objects we want to insert into the scene. At the end of this process, we will have a scene graph estructure like this:
ADVICE: mass around with object’s position, and it’s links:
– change the coordinates values in platform and wall objects;
– link the wall, to the platform: self.wallreparentTo(self.plataforma);
– change the coordinates again;
– link the platform to the wall, and change the coordinates again.
This will help you to understand better this subject in Panda3D.