Files for Panda3D tutorial

Below you will find the files for the Panda3D tutorials.

Panda-project (15Mb .zip format)

Organizing project files.

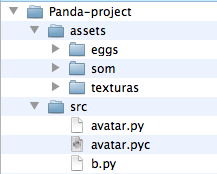
To the code files and the assets files work as expected, is required to organize them in a certain structured way, as illustrated below:

Panda3D_projectFolder
The role project must be inside a folder called Panda-project.

Down below Panda-project, there will be two folders assets and src. The assets folder will hold the art files for the project (models, textures, audio files, etc.). For that reason, this assets folder has three children folders: eggs, textures(texturas), audio(som) (the names are in Portuguese).

The src folder (src stands for source) is where we will save all our code files, named with .py extension.

Animations :: Gamedev Panda3D cookbook

Every game uses animations to provide more immersion to the players.

In 3D games, animations and models, are made in specific softwares like Maya, Blender, 3DStudio, etc, and later on they are imported by the game engine.

Other common detail is that game engines usually uses separate files to the 3D models, and other files for the animations. This approach allows developers to manipulate those files more independently.

In Panda3D, you 3D model files (the model itself as well the animations) must be converted to the .egg format. This is a specific Panda3D’s file type, gracefully Panda3D, has some software to make such conversions from 3D modelers. Check Panda3D’s web site for more details.

When you want to use some rigged animated model on Panda3D, you must use the class Actor.

In order to complete this tutorial, you need to download some files, and follow some instructions to set then up correctly.

sample 1:

[code lang=”python”]

from direct.showbase.ShowBase import ShowBase
from direct.actor.Actor import Actor

class MyApp(ShowBase):
def __init__(self):
ShowBase.__init__(self)
self.loadModels()

def loadModels(self):
self.personaActor = Actor(‘../assets/eggs/personagem.egg’,
{
‘idle’:’../assets/eggs/personagem-parado’,
‘run’ :’../assets/eggs/personagem-correr’,
‘jump’:’../assets/eggs/personagem-pular’
}
)
self.personaActor.setScale(1)
self.personaActor.reparentTo(render)
self.personaActor.setPos(0,20,0)
self.personaActor.loop(‘run’)

game = MyApp()

run()

[/code]

In the sample above, a model with three animations was imported, and set up to run one animation. In this case, a rigged model is been used, so we need to instantiate the Actor class. The Actor class demands:

– import a model file;

– a python dictionary with the animation names as keys, and it’s files as values.

In this case:

– the model. Located at folder: ‘../assets/eggs/personagem.egg’

– Animation ‘idle’. Located at folder: ‘../assets/eggs/personagem-parado’

– Animation ‘run’. Located at folder: ‘../assets/eggs/personagem-correr’

– Animation ‘jump’. Located at folder: ‘../assets/eggs/personagem-pular’

At the end, a loop() command sets the animation ‘run’ to be executed as a infinity loop. In case you want to test, try change the line: self.personaActor.loop(‘run’), and change the ‘run’, inside the loop() function call to ‘idle’ and ‘jump’. You will see diferent animations.

sample 2:

[code lang=”python”]

from direct.showbase.ShowBase import ShowBase
from direct.actor.Actor import Actor

class MyApp(ShowBase):
def __init__(self):
ShowBase.__init__(self)
self.loadModels()

self.accept(‘w’, self.changeAnimation, [‘run’])
self.accept(‘space’, self.changeAnimation, [‘jump’])
self.accept(‘s’, self.changeAnimation, [‘idle’])

def loadModels(self):
self.personaActor = Actor(‘../assets/eggs/personagem.egg’,
{
‘idle’:’../assets/eggs/personagem-parado’,
‘run’ :’../assets/eggs/personagem-correr’,
‘jump’:’../assets/eggs/personagem-pular’
}
)
self.personaActor.setScale(1)
self.personaActor.reparentTo(render)
self.personaActor.setPos(0,20,0)
self.personaActor.loop(‘run’)

def changeAnimation(self, name):
self.personaActor.loop(name)

game = MyApp()

run()

[/code]

In sample 2, there is a example showing how to change animations with user input. By pressing key ‘w’ the ‘run’ animation is played; by pressing key ‘s’, the ‘idle’ animation is played; And by pressing key ‘space’, the ‘jump’ animation is played.

You will see that the animation transition is quite bad. That because there is no blending during animation transitions. In next sample, we will fix that.

sample 3:

[code lang=”python”]
from pandac.PandaModules import loadPrcFileData
loadPrcFileData(”,’show-frame-rate-meter 1′)

from direct.showbase.ShowBase import ShowBase
from pandac.PandaModules import *
from direct.actor.Actor import Actor
from direct.interval.IntervalGlobal import *

class MyApp(ShowBase):
def __init__(self):
ShowBase.__init__(self)
self.loadModels()

self.accept(‘w’, self.changeAnimation, [‘run’])
self.accept(‘space’, self.changeAnimation, [‘jump’])
self.accept(‘s’, self.changeAnimation, [‘idle’])

#self.state: helps in changing animation logic
self.state = { ‘idle’:True,
‘run’:False,
‘jump’:False}

#self.blend: The ‘Interval’ with ‘LerpFunction’ is used to change the control effect smoothly
self.blend = LerpFunc(self.blendAnim, fromData = 0, toData =1,
duration = .2, blendType=’noBlend’,
extraArgs=[], name=None)

def loadModels(self):
self.personaActor = Actor(‘../assets/eggs/personagem.egg’,
{
‘idle’:’../assets/eggs/personagem-parado’,
‘run’ :’../assets/eggs/personagem-correr’,
‘jump’:’../assets/eggs/personagem-pular’
}
)
self.personaActor.setScale(1)
self.personaActor.reparentTo(render)
self.personaActor.setPos(0,20,0)

#enable Blend in animations (mandatory)
self.personaActor.enableBlend()

#let’s run all animations in loop at once
self.personaActor.loop(‘run’)
self.personaActor.loop(‘idle’)
self.personaActor.loop(‘jump’)

#setControlEffect: sets the “weight” that each animation will impolse to the model(1 = 100% ; 0.1 = 10%)
self.personaActor.setControlEffect(‘jump’, 0.0)
self.personaActor.setControlEffect(‘idle’, 1.0)
self.personaActor.setControlEffect(‘run’, 0.0)

def changeAnimation(self, name):
# This function will be called by an user input, with the argument ‘name’,
# this ‘name’, is the name for the next animation to play.
# The LerpFunction self.blend, shall receive as extra arguments,
# the name for current state (self.state – check getCurrentState function code),
# the name for the next animation
self.blend.extraArgs = [self.getCurrentState(), name]
self.blend.start()

def getCurrentState(self):
if self.state[‘idle’]: return ‘idle’
elif self.state[‘run’]: return ‘run’
elif self.state[‘jump’]: return ‘jump’
else: return None

def changeStateTo(self, name):
self.state[‘idle’] = False
self.state[‘run’] = False
self.state[‘jump’] = False
self.state[name] = True

def blendAnim(self, data, current, next):
# This function is called every frame during LerpFunction life (0.2 seconds),
# the animation’s ‘weight’ is changed slowly, and transitions blends.
# Smooth transitions!!
self.personaActor.setControlEffect(current, 1-data)
self.personaActor.setControlEffect(next, data)

if data == 1:
# at the end, we change the current state.
self.changeStateTo(next)

game = MyApp()

run()

[/code]

Collisions :: Gamedev Panda3D cookbook

Detect collision between game objects is a crucial practice in (almost) any game. Beside collision detection, is also important to know what to do, when collisions occur.

Game engines, always provide collision detection features, and is very important to watch the “elements” used in this procedures.
Panda3D gives us:
– Collision handlers: out of the box behaviors to be use;
– Collision geometries (sphere, cube, plane, capsule, line, ray …);
– 3D mesh collisions;
– Collision events.

When a collision is detected, events are dispatched through out the system, and those events can be captured by game objects, and trigger some actions.

sample 1:

[code lang=”python”]
from direct.showbase.ShowBase import ShowBase
from direct.task import Task
from pandac.PandaModules import *

class MyApp(ShowBase):

def __init__(self):
ShowBase.__init__(self)

# Create a Traverser and Handlers: step one
base.cTrav = CollisionTraverser()
base.pusher = CollisionHandlerPusher()
base.pusher.addInPattern(‘%fn-into-%in’)

self.cube = self.loader.loadModel(“box”);
self.cube.reparentTo(self.render)
self.cube.setScale(1)
self.cube.setPos(-3,10,-2)

# create colliders: step two
self.cubeCSphere = CollisionNode(“cubeCSphere”)
self.cubeCSphere.addSolid( CollisionSphere(0,0,0, 1.05) )
self.cubeEsfNP = self.cube.attachNewNode(self.cubeCSphere)
self.cubeEsfNP.show()

# Point to the Traverser and to the Handler, which objects must be “watched” to capture it’s collisions: third step
base.cTrav.addCollider( self.cubeEsfNP, base.pusher )
base.pusher.addCollider( self.cubeEsfNP, self.cube )

self.smiley = loader.loadModel(‘smiley’)
self.smiley.reparentTo(self.render)
self.smiley.setScale(0.5);
self.smiley.setPos(3, 10, -1.5)

self.smileyCSphere = CollisionNode(“smileyCSphere”)
self.smileyCSphere.addSolid( CollisionSphere(0,0,0, 1.05) )
self.smileyEsfNP = self.smiley.attachNewNode(self.smileyCSphere)
self.smileyEsfNP.show()

self.taskMgr.add(self.taskFunction, “testing Task”)
self.accept(‘cubeCSphere-into-smileyCSphere’, self.collisionEvent)

def collisionEvent(self, entry):
print “Game objects did collide!!”
print entry

def taskFunction(self, task):
self.cube.setX(self.cube.getX()+0.05)
return Task.cont

app = MyApp()
app.run()
[/code]

In the sample above, a simple collision, between the cube and a smiley, is detected, and because a CollisionHandlerPusher were use as a collision handler, the objects do not cross each other. In addition, an event were dispatched, in order to trigger some action, in this case, an output with collision info were printed in the console.

Lets take a closer look at the Panda3D’s procedures steps:
1- Creation of CollisionTraverser and a CollisionHandler;
2- Creation of: CollisionNode and CollisionSolid;
3- Attach CollisionNodes and CollisionSolid to CollisionTraverser and CollisionHandler.

Steps:
Step 1:

# Creation of CollisionTraverser and a CollisionHandler: step one
base.cTrav = CollisionTraverser()
base.pusher = CollisionHandlerPusher()
base.pusher.addInPattern(‘%fn-into-%in’)

First thing, a CollisionTraveser is created; than, a CollisionHandler is created as a Pusher (the CollisionHandlerPusher do not allow game objects to pass through each other). In the third line, is added to the “Pusher”, an order to dispatch events when collisions occur.

Step 2:

# Creations of colliders: second step
self.cubeCSphere = CollisionNode(“cubeCSphere”)
self.cubeCSphere.addSolid( CollisionSphere(0,0,0, 1.05) )
self.cubeEsfNP = self.cube.attachNewNode(self.cubeCSphere)
self.cubeEsfNP.show()

This step is a bit more complicated.
Literally the code says:
– Create a collision node called “cubeCSphere”, and save the path to it, in the variable self.cubeCSphere;
– Add a collision solid sphere to the collision node “cubeCSphere”.
– Attach the collision node to cube node (self.cube), and save this node path in the variable self.cubeEsfNP.
– render the collision node (as a sphere were set as a collision solid, the engine will render a transparent sphere).

This commands are mandatory, except by the self.cubeEsfNP.show(), which serves only as a pre-view.

Observe that this steps must be set for each game object which will interact through collisions. For example, the smiley object also receives those collision nodes.

Step 3:

# Point to the Traverser and to the Handler, which objects must be “watched” to capture it’s collisions: third step
base.cTrav.addCollider( self.cubeEsfNP, base.pusher )
base.pusher.addCollider( self.cubeEsfNP, self.cube )

After setting the collision nodes (CollisionNode, steps 1 and 2), is absolutely required to inform the system how to deal with collisions.
The command: base.cTrav.addCollider( self.cubeEsfNP, base.pusher ), says the Traverser that collisions related to the collision node self.cubeEsfNP, must be treated by the handler “Pusher”.
The command: base.pusher.addCollider( self.cubeEsfNP, self.cube ), says to the “Pusher”, when collisions related to the collision node self.cubeEsfNP occurs, the “pusher” behavior, must be applied to the node self.cube.

This is a good example to be use in situations when objects can not pass through other objects, like an character can not pass through a wall.

The three steps we’ve seen thus far, show the basic set up for collisions in Panda3D. Now let’s see a interesting detail: how to dispatch events when collisions occur.

This is possible to be done in Panda3D, thanks to the CollisionHandlerEvent, that dispatches events when a collision is detected. The CollisionHandlerPusher is a subclass of CollisionHandlerEvent, as such, it inherits the collision events features.

When the CollisionHandlerPusher was created (step 1), pay attention at the command: base.pusher.addInPattern(‘%fn-into-%in’). This is the set up command that says to the Pusher, which patterns of collision can generate events.

See the line:
self.accept(‘cubeCSphere-into-smileyCSphere’, self.collisionEvent)
This line is the command used to capture events in the system, in this case, this event is gonna be generated by the Pusher when the cube collide into the smiley (‘cuboCEsfera-into-smileyCEsfera’), than we are gonna capture it, and do something in the self.collisionEvent function.

So, once the event is captured the function self.collisionEvent is called. Pay attention that when a collision event is captured, the function that deals with it, must be ready to deal with an argument “entry”, which gives you the many important informations about the collision itself, like coordinates, normals, etc.

sample 2:

[code lang=”python”]

from direct.showbase.ShowBase import ShowBase
from direct.task import Task
from pandac.PandaModules import *

class MyApp(ShowBase):

def __init__(self):
ShowBase.__init__(self)

# CCreation of CollisionTraverser and a CollisionHandler: step one
base.cTrav = CollisionTraverser()
base.event = CollisionHandlerEvent()
base.event.addInPattern(‘%fn-into-%in’)
base.event.addAgainPattern(‘%fn-again-%in’)
base.event.addOutPattern(‘%fn-outof-%in’)

self.cube = self.loader.loadModel(“box”);
self.cube.reparentTo(self.render)
self.cube.setScale(1)
self.cube.setPos(-3,10,-2)
# Create colliders: step two
self.cubeCSphere = CollisionNode(“cubeCSphere”)
self.cubeCSphere.addSolid( CollisionSphere(0,0,0, 1.05) )
self.cubeEsfNP = self.cube.attachNewNode(self.cubeCSphere)
self.cubeEsfNP.show()
#Point to the Traverser and to the Handler, which objects must be “watched” to capture it’s collisions: third step
base.cTrav.addCollider( self.cubeEsfNP, base.event )

self.smiley = loader.loadModel(‘smiley’)
self.smiley.reparentTo(self.render)
self.smiley.setScale(0.5);
self.smiley.setPos(0, 10, -1.5)

self.smileyCSphere = CollisionNode(“smileyCSphere”)
self.smileyCSphere.addSolid( CollisionSphere(0,0,0, 1.05) )
self.smileyEsfNP = self.smiley.attachNewNode(self.smileyCSphere)
self.smileyEsfNP.show()

self.taskMgr.add(self.taskFunction, “testing Task”)

#Capture Collision Events
self.accept(‘cubeCSphere-into-smileyCSphere’, self.collisionEventIN)
self.accept(‘cubeCSphere-again-smileyCSphere’, self.collisionEventAGAIN)
self.accept(‘cubeCSphere-outof-smileyCSphere’, self.collisionEventOUT)

def collisionEventIN(self, entry):
print “Objects did collide!!”
print entry

def collisionEventOUT(self, entry):
print “Objects did stop colliding!!”
print entry

def collisionEventAGAIN(self, entry):
print “Objects are still colliding!!”

def taskFunction(self, task):
self.cube.setX(self.cube.getX()+0.05)
return Task.cont

app = MyApp()
app.run()
[/code]

In this sample there is a demonstration of the usage of CollisionHandlerEvent. This collision handler do allow objects to pass through each other, so in this case, the cube will pass through the smiley with no problem.

The CollisionHandlerEvent, is a great way to create sensors around the game arena. For example, an avatar pass through a gate, and a trap is triggered.

Observe the changes in steps 1 and 3, and in the event capture set up.
The changes are small. The most import are when we create and when we capture the events. In this sample, not only we set up the ‘into’ event, but also we defined the ‘outof’ and the ‘again’.

Events “into”, occur when a game object collide into another.
Events “outof”, occur when game objects stop colliding each other.
Events “again”, occur when game objects are colliding.
Events and Inputs :: GameDev Panda3D cookbook

Inputs and events are common elements in software development as a whole. A user input is usually some interaction method given to the user be able to command the software. It can be triggered by a key, a mouse click, a voice detection system, a touch on the screen.
Events are commands exchanged between elements of software. In the case of a game, we can imagine the following situation: A character is walking through a castle, where there is a trigger of a trap. When the character goes through the trigger, the trigger signals the trap to shoot arrows that will kill the character.
In this short description, we can say that the trigger sent a message to the trap shoot. This message is what we call events.

Both user inputs and events between objects have a vital role in game development.

Let’s see how to catch a keyboard event, in this case, when the ‘W’ key was pressed.

sample 1:

User Inputs in Panda3D, are sent to the system as events. When a key is pressed, an event message is sent throughout the system, what developer must do, is set an object to “listen” to a specific event.

This procedure is done in two steps:
1- Set the event which we are interested in: self.accept( ‘event name’, function)
2- Define a function to deal with the event. Basically, “what must be done, after the event were triggered”.

In the sample above, the event created by the pressure in ‘W’ key, is caught and treated by the function ‘catchKeyPressed’.

sample 2:

In this second sample, we have new possibilities: parameters, and event ‘up’.

The event ‘-up’, is used to catch the event generated when a key is unpressed.

EVENTS——————————

Events, like said before, are a way to make game object to talk with each other.
In general, there are two steps to make it happens:
1- Define which event an object needs to be aware of;
2- Give the commands to send the messages.

In Panda3D, user inputs are events, so we can catch events in the same way we configure user inputs.
Now, let’s see how to send some event.

sample 1:

When the ‘w’ key is pressed, a task is created, and the taskFunction is gonna make the cube move towards right. As soon as the cube x position be bigger than 3, an event is sent to the system (messenger.send( “stopCuboEvent”) ). This event is caught by our class and executes the stopCubeFunction, which deletes the task, and the cube stops.

Tasks :: Gamed Panda3D cookbook

“Tasks” is a function used in Panda3D, which refer to: “The need to provide for certain game objects, execution loops.”
For example, when creating a character in a game, the programming of this character may have some functions that should be checked, and executed in every single frame.
Different game engines have different names, and ways to implement these procedures. Here we’ll see how it works in Panda3D.

Panda3D —————————–

sample 1:

To build a Task in Pand3D is very simple.
In line: self.taskMgr.add(self.taskFunction, “testing Task”), the task named “testing Task”, is created. And the function self.taskFunction is set as the function which is going to be called every frame.

It is free for the developer, choose the method he wants to set for the tasks, as well, decide the functions names as his wish.

The task function, in the sample above, has a mandatory parameter, called “task” and a return value, also required, which is a Task constant, in case, Task.cont.

sample 2:

In this last sample code, it is possible to see, how to modify a game object positioning properties (It worth mention that basically, any property might be edited during a task.) In this case, the x value is changed in 0.01, every single task execution, giving the illusion that the cube is moving towards the right.

Is possible to create some more specific behaviors in tasks, like, stopping the task execution after a while:

sample 3:

In this sample, the return value for the task function will be Task.cont (“Task.continue”), while the cube x position is less than 3. As soon the cube x position, become bigger than 3, the return value is gonna be Task.done, and the task will no longer be executed.

sample 4:

In this last sample, it is possible to see that the cube moves in intervals of two seconds. In this sample, we use the method ‘doMethodLater’, that allows the developer to set a time wait, till the task start be executed. And when the task is executed, a delay time (task.delayTime) is set to retard the next task execution.

Tasks run a major role in Panda3D games and are use in many situations. So… master them.

Published: Panda3D GE book

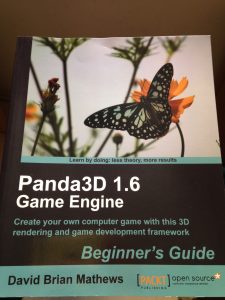
Panda3D game engine book coverI just received my copy of the book 1.6 Panda3D game engine, by David Brian Mathews (published by Packt Publishing), which I was a technical reviewer.

The book is suited for anyone who’s starting to learn Panda3D.

The Panda3D engine is very simple to use and flexible. I started studying the Panda3D during my specialization studies, and its simplicity leads us to choose Panda3D in our final project.

The book written by David, is excellent, and easy to understand, although it requires a minimum understanding of programming and logic. But readers, newbies at the game development will easily understand the Panda3D’s tools described in this book, which I think, is the only publication about this game engine, apart from and some blog posts, and the official Panda3D’s guide, and docs.

Soon, I expect to write some posts about this book: some specifics topics for Mac and Linux; some ways to solve the problems posed in the book; and a tutorial on programming using Panda3D.